This guide will show you how to create and manage forms using the XLSForm syntax.
Form Basics
What is an XLSForm?
XLSForm is a syntax used to author forms using a spreadsheet program such as Excel or Google Sheets. It is a practical standard for sharing and collaborating when creating forms. The XLSForm syntax is human-readable, so it is easy to learn and use. As the name implies, XLSForm files are saved as .xls or .xlsx files for import into Ona Data.
Why does Ona use XLSForms?
Ona Data uses XLSForm because it makes it easy to create, collaborate and edit forms of any length or complexity. It’s also easy to work from previously-made forms, saving time and letting you share your form easily.
How should I get started authoring XLSForms?
We recommend that you start with the basic form tutorial. You can also watch the XLSForm Authoring video. Next, if you already have a form you want to create, you can start authoring using XLSForm.org for reference and asking questions you have on the Ona Community Support Forum.
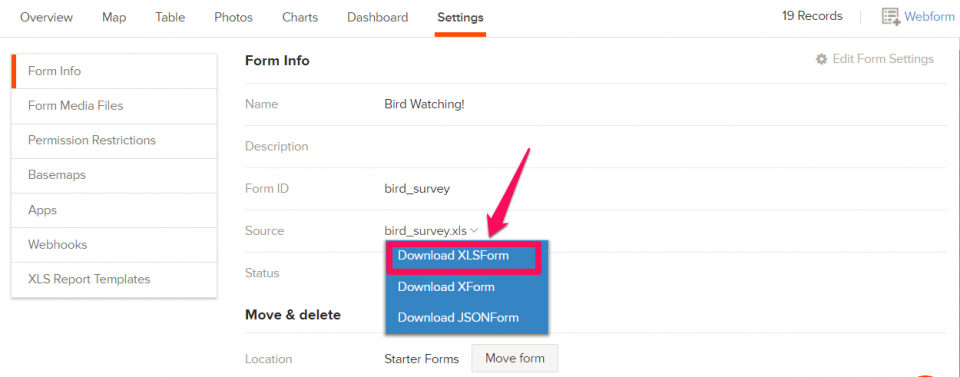
We’ve also provided several starter XLSForms to give you a sense of the possibilities and give you a place to start if you are authoring a similar form. Another option for starting from an existing form is using a form that you have access to on Ona. You can download an existing form by going to the form’s Settings page, clicking on the Form Info tab, then selecting Download XLSForm from the Source dropdown menu.
XLSForm tips for beginners
These are three useful tips that designers should be aware of:
- Test your form often! Don’t wait until your form is completely finished before trying to upload it to your Ona Data account. It is much easier to identify and correct errors on a form that has 20 fields versus a form that has hundreds of fields. You might notice a mistake in your syntax early on that will save you loads of time by catching it early and not repeating it throughout the rest of your form.
- XLSForm syntax is unforgiving. If you are one letter or one number off, or if there’s an extra space or an extra comma somewhere in your expression, you will most likely get an error when trying to upload your form. In this case, practice makes almost perfect. We say ‘almost’ perfect, because even seasoned XLSForm authors will make simple syntax errors every once in a while. In general, though, the more you practice authoring forms in Excel, the more familiar you get with the syntax, and the easier it is to spot errors. If you are simply really stuck on a line of the syntax that keeps throwing errors, and you start to swear on your life that what you typed is absolutely correct, take a break! Come back to your form later on, and you’d be surprised what your refreshed eyes will spot. Below are important guidelines to remember:
- Your file should be saved in the .xls or .xlsx format and should contain no spaces or special characters (‘-’ and ‘_’ are allowed).
- Sheet names should be appropriately named (i.e. “survey” not Sheet 1, “Survey” or “surveys”).
- Column headers should be in lowercase (i.e. “label” or “name”, not “Label” or “Name”).
- Field names should be unique and should not contain spaces or special characters (‘-’ and ‘_’ are allowed).
- XLSForm.org is your form-authoring friend. This website is actively maintained and updated often as new features are introduced to the XLSForm standard. It contains important reference documentation for all the basic and advanced features of XLSForm authoring. Links are provided to sample surveys that demonstrate the use of each feature.
Basic Form Tutorial
For this tutorial we will be using the following survey:
- What’s your name?
- How old are you?
- Gender
- Take a picture
- Date
- Where are you?
- Do you like pizza?
To write a simple form, each Excel workbook usually has two main worksheets: survey and choices. The survey worksheet gives your form its overall structure and contains most of the content of the form. The choices worksheet is used to specify the answer choices for multiple-choice questions. Each row in this worksheet represents an answer choice.
- To author an XLSForm, create a new Excel workbook with a single sheet named survey;
- Add three columns type, name, and label:
- type describes the question type;
- name is the variable name as it will be stored in the database;
- label is the question text;
- To start populating the XLSForm, add the questions above to the survey worksheet:
- On your type column, specify the type of information to be entered (integer, text, date, etc). You can have a look at a complete list of question types.
- Under the name column, add a unique name on the field;
- Then, add the text for your question in the label column;
- Add a second worksheet named choices;
- Create three columns list_name, name and label:
- list_name specifies the name of a multiple-choice question type;
- name specifies the internal value stored for a given choice;
- label specifies the label to use for a given choice, in the form’s default language;
- In the survey worksheet, for the select_one [option] questions, set to select_one followed by space and replace [options] with the list of choices/options, in our case, the Gender question will be select_one gender;
- In the choices worksheet, copy and paste the option (i.e gender) to the column list_name; then populate the name and label with all the options that are anticipated.
- Name your Excel file and save as .xls or .xlsx format. You can now upload your .xls file into your Project on Ona.
Advanced Form Authoring Techniques
Adding media files to forms
Adding media files, such as images, audio, or videos to your XLSForm can add context to your questions and provide visual and audio support to surveyors or surveyees. You can add the following media files to your form:
| Supported files | |
|---|---|
| Image files | jpeg, jpg, png, zip |
| Audio files | mp3, wav |
| Video files | 3gp, mp4 |
| File attachments | csv |
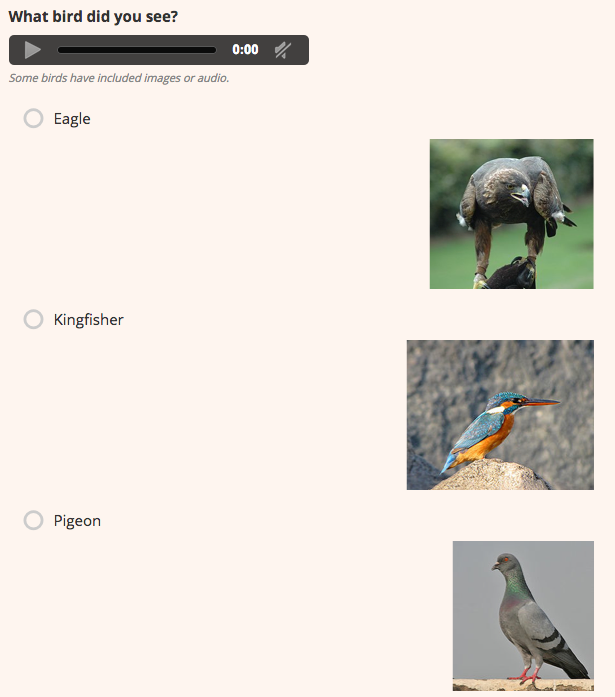
An example of a form with media files is the Bird Watching survey. Respondents are asked to select which bird they sighted from a list. A picture of each bird species is included next to the bird name to help the respondent verify their selection as shown in the screenshot below.
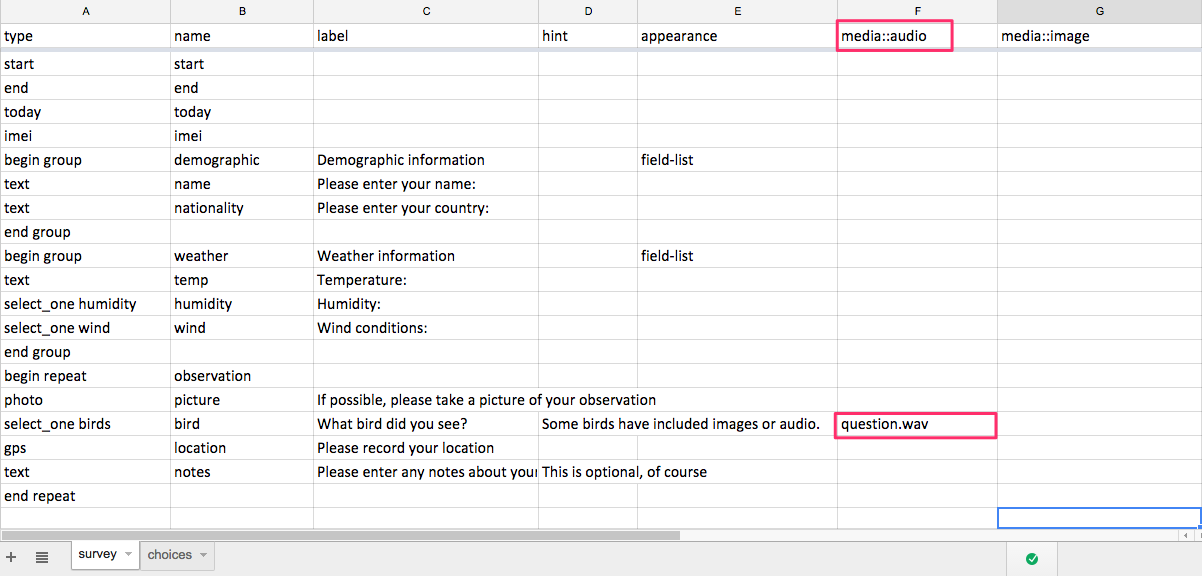
The survey worksheet from this XLSForm is shown in the screenshot below:

The choices worksheet can be seen in the screenshot below:

Note:
- The media::image column in the choices worksheet of your survey. Next to each answer choice of a bird, the corresponding image file name is written in the media::image column, including the image file extension (.png or .jpg).
- The media file name cannot have spaces. Instead use a underscore ( _ ).
If you wanted to include audio or video in your form, then you would simply add separate media::audio and media::video columns to your form and add the corresponding audio and video file names in those columns. Media files can be added to questions in the survey tab of your XLSForm in addition to answer choices in the choices tab.
In addition, if your survey has multiple languages, you will need to have separate media columns for each language by appending::language to the media columns. For example, to add image media files to a survey in both English and Swahili languages, you would add the following two columns to your XLSForm:
media::image::English and media::image::Swahili
If using the same image for both languages, you simply write the same image file name in both columns.
For audio and video files, you would simply replace the image with audio and video, respectively:
media::audio::English and media::audio::Swahili
media::video::English and media::video::Swahili
Where do I put media files that I want to add to a form?
In order for media files to be displayed in the form, the media files need to be uploaded to the form on your Ona Data account.
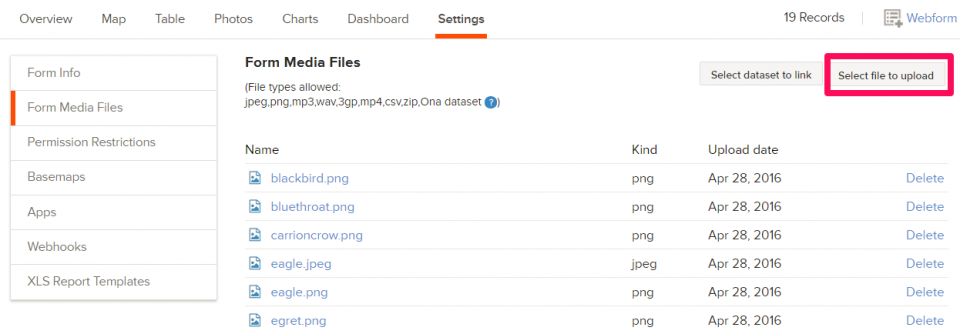
- On the form’s Settings page in your Ona Data account, select Forms media files;
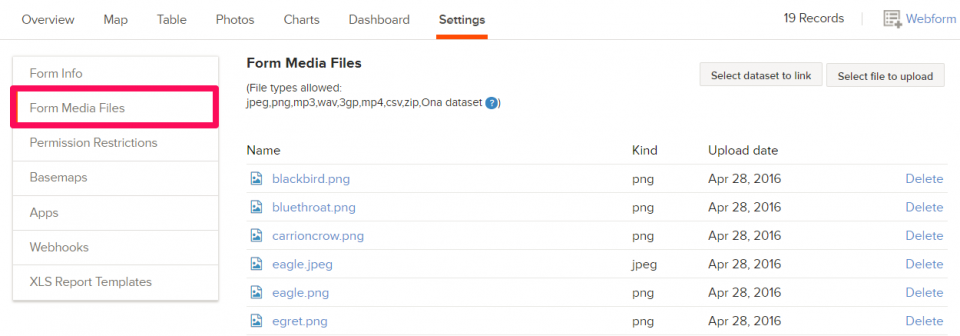
- Then, click on Select file to upload button to upload your media file;
Note:
The media file names that you upload to the form on Ona Data must match the media file name specified in the media column in your XLSForm exactly. Spelling and punctuation are important! For example, if your media file is named as blackbird.png, then you cannot reference it as Blackbird.png or blackbirdpng in your XLSForm.
Once your media files are uploaded to the form, they are automatically displayed when viewing your Enketo web form. If using ODK Collect, the media files will automatically download with the form to your phone or tablet and be stored in the form’s media folder on your device. If downloading media files to your phone presents a challenge, see the instructions on how to manually add media files to your phone instead.
Managing Forms
Upload your form
Once you have successfully authored your XLSForm, you can upload it to your desired project on Ona Data. After uploading, you can preview the web form. Read more on the various ways of uploading XLSForms here.
Replace forms
Forms uploaded to your Ona Data account can be replaced using the Replace Form option in the form’s dropdown menu. You can replace a form that has no submissions as explained in this guide. Ona also supports replacing a form that has submissions.
Note:
In order to replace an existing form on Ona Data, the form id’s must be the same. If you must change the form id on the updated version, then you will need to upload it as a new form.
Make forms inactive
An inactive form cannot receive any submissions, and inactive forms do not show up in the list of forms available to download when using ODK Collect. Essentially, making a form inactive archives the form and helps prevent any changes from being made to the form or its data.
Making a form inactive is a good option when data collection has finished, as it prevents users from making changes, and the inactive form and its data will be stored on Ona Data indefinitely. It is also a good alternative to deleting a form from your account. Data contained in an inactive form will still be available in your account and can be accessed by making the form active once again.
You can make a form inactive one of two ways; i.e. when uploading your XLSForm and from the form’s drop-down menu.
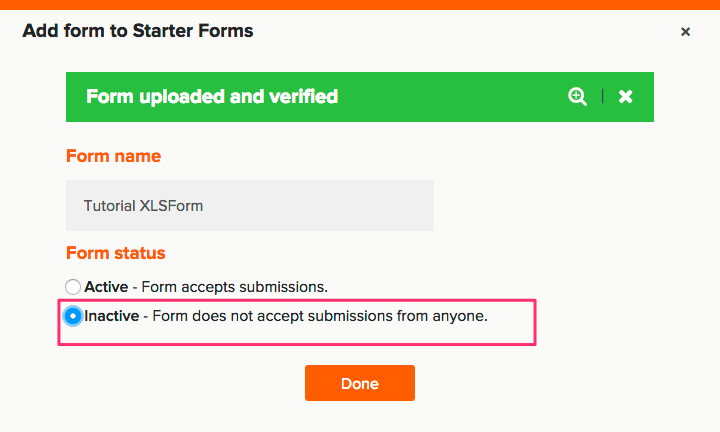
When uploading your XLSForm
When uploading your XLSForm, you can choose Inactive from the form upload verification window.
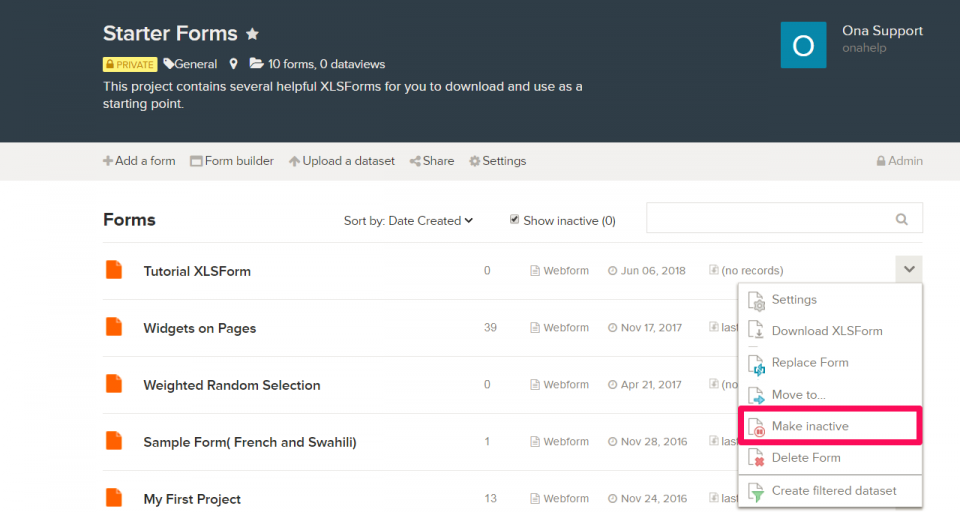
From the form drop-down menu
Forms already uploaded to your Ona account can be made inactive using the Make inactive option in the form’s dropdown menu as highlighted in the screenshot below;
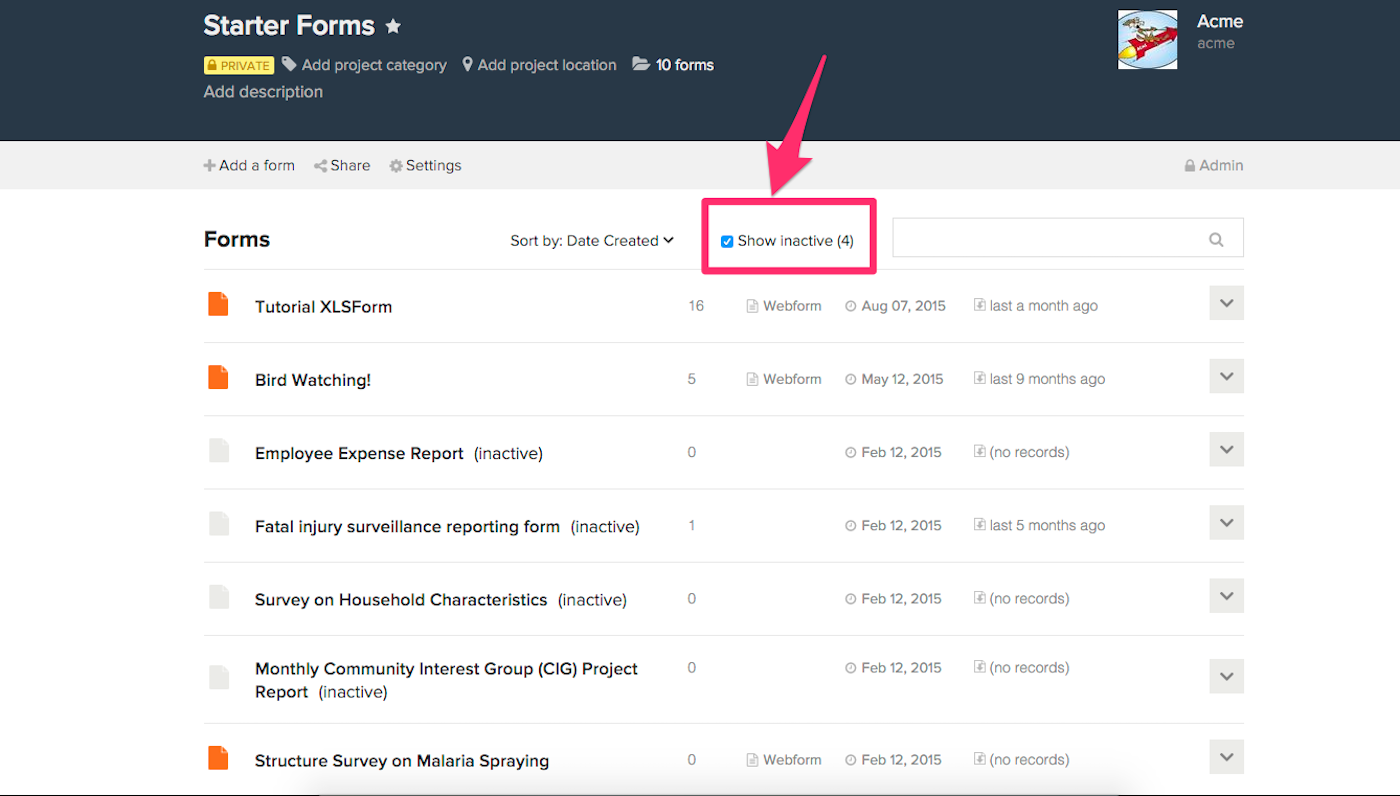
Show inactive forms
When you first access the project view page, by default all inactive forms and the number of inactive forms are shown in parentheses. The Show inactive checkbox is automatically selected, and the number of inactive forms is also revealed:
If you don’t need to see all the forms including the inactive forms, you can turn them off by clicking on the Show inactive checkbox, inactive forms will no longer be revealed:

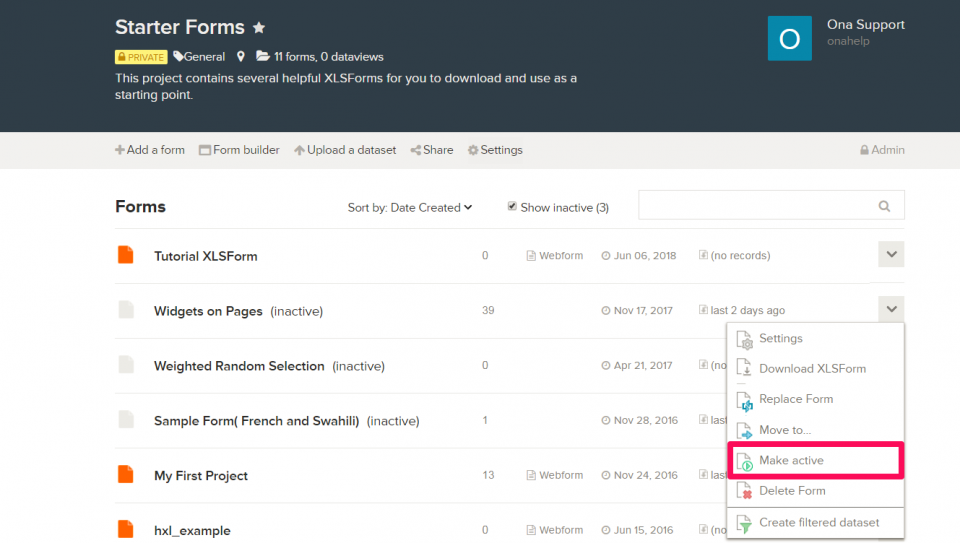
To make inactive forms active again, ensure the Show inactive checkbox is selected then from the inactive form’s dropdown menu, select the Make active option as shown in the screenshot below;
Move forms
Forms uploaded to a project can be moved to a selected project as long as you have add form permissions in that project.
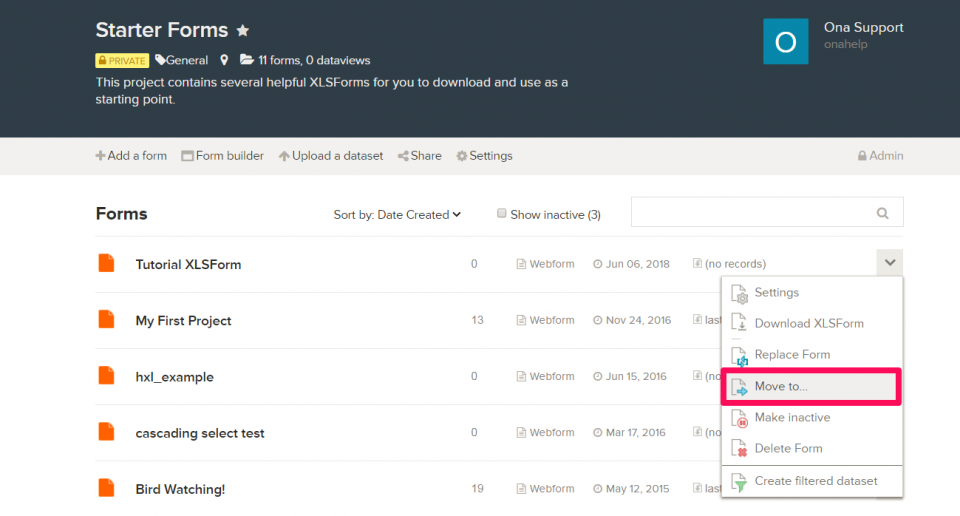
To move a form to a different project:
- From the form’s dropdown menu, select the Move to option;
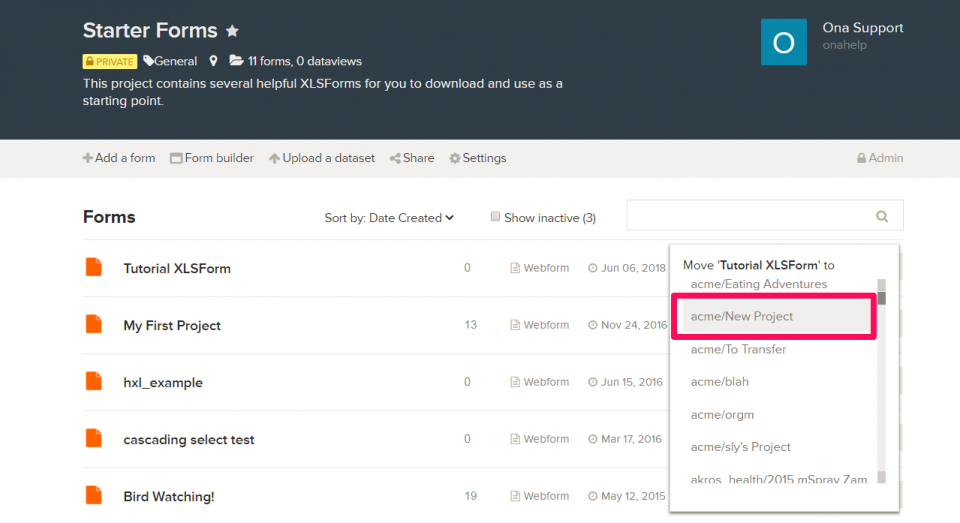
- Click on the name of the project you’d like to move the form to from the list of projects you have Admin access to;
Delete forms
Forms uploaded to your Ona Data account can be deleted using the Delete Form option in the form’s dropdown menu. Below are the steps to follow to delete a form in your Ona Data account.
To Delete a form:
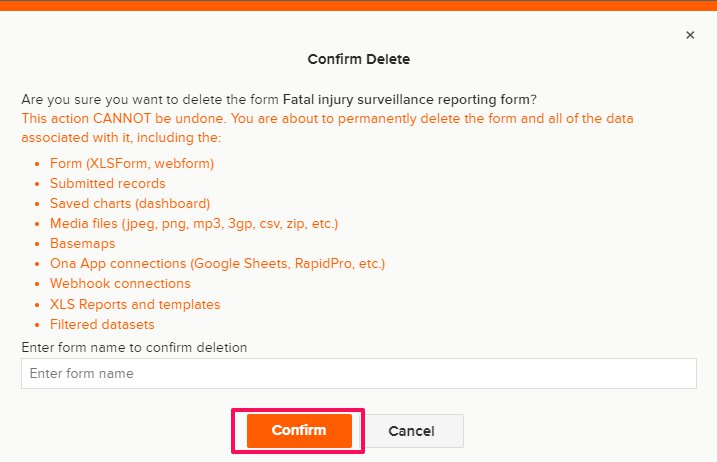
- Locate the form you would like to delete on your project page, from the form’s drop-down menu select Delete form;
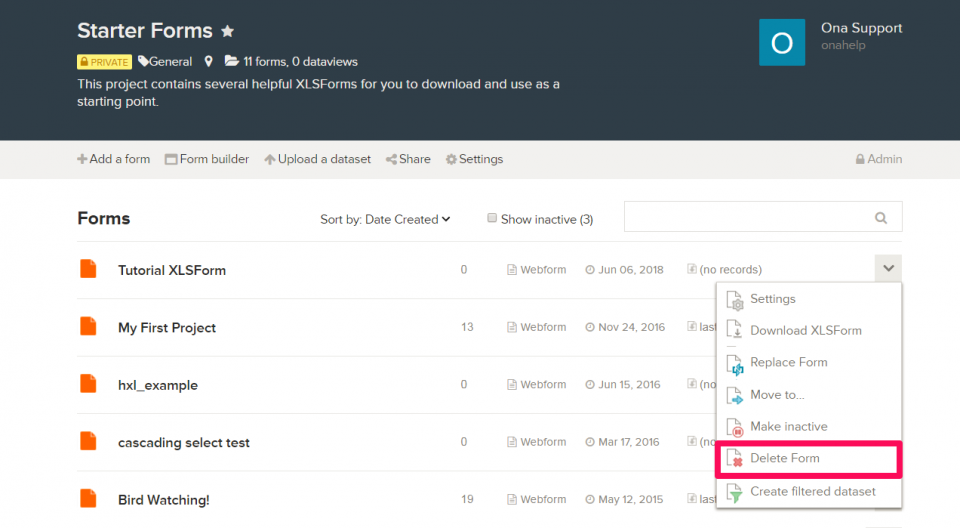
- Be sure to read the instructions that appear in the dialogue box. You will be required to type in the name of the form to confirm the deletion. Once this is done, click on the Confirm button to delete the form:
Note:
Deleting a form cannot be undone. Once a form is deleted, the form and any data already submitted or uploaded to the form will be gone and cannot be recovered.
Below are videos illustrating the form menu and the form settings interface on the Ona platform.