You can encrypt form submissions to the Ona server using ODK Collect or Enketo web forms. Encrypted forms are useful for projects that have strict data security requirements from ethical review boards.
How does form encryption work?
Forms are encrypted on your mobile device once they are marked as finalized in ODK Collect. The data remains encrypted on your mobile device until it is uploaded to the Ona server. However, forms are encrypted once the records are finalized and saved in the web browser in Enketo. Enketo generates and uses a random single-use encryption key to symmetrically encrypt all the data and attached files, such as photos.
Once the form is submitted from either ODK Collect or Enketo, Ona serves as a storage locker for your encrypted files – they are safely stored and encrypted on the server until they are downloaded and decrypted using ODK Briefcase. Since the form submissions on Ona are encrypted, you will not be able to use the view data features in your account, such as the map view or table maker, and you will not be able to view the data in csv or xls formats until it is decrypted using ODK Briefcase.
Setting up encryption keys
In order to encrypt your form, you need to generate public and private encryption keys:
- the public key is included in your XLSForm, as described below;
- the private key (which you never share) is pulled into ODK Briefcase to decrypt the data locally after you’ve downloaded it from Ona.
The public key is used to encrypt your form data while the private key decrypts it. Anyone with that private key can decrypt the data, so keep the private key in a secure place. To understand more about public and private key infrastructure, check out this page on Wikipedia.
Generation of RSA Encryption Keys
To generate your private and public encryption keys, you can use the OpenSSL software package. This software comes pre-installed on OSX and Linux systems, and it can be downloaded here for Windows. Instructions on generating key pairs using OpenSSL software can be found at this ODK site.
How to generate RSA keys for use with encrypted forms
On Windows
- Ensure that you have downloaded OpenSSL from this site.
- Extract the downloaded zip file to a directory of your choice, i.e. Desktop.
- Then, add the directory where OpenSSL was extracted to the Windows environment path. For example C:\Users\William\Desktop\openssl\bin. Check on this link for more details on adding to a path.
- Open your Windows ‘cmd’ window.
- Change the directory to the `/bin` directory in the OpenSSL directory you created in Step 3.
- Create a 2048-bit private key and write it to the MyPrivateKey.pem file by typing the following command then press Enter: openssl genrsa -out MyPrivateKey.pem 2048

- In order to extract your public key, which will be written to a MyPublicKey.pem file, type the following command on the terminal, then press Enter: openssl rsa -in MyPrivateKey.pem -inform PEM -out MyPublicKey.pem -outform PEM -pubout

- Make sure to move the MyPrivateKey.pem file to a secure location. The file does not have a password encoding it, meaning anyone can decrypt your data if they get access to this file. This key will be used by ODK Briefcase to decrypt your files.
On OSX
- Open the terminal by typing Cmd+Space. Search for Terminal, then press Enter.
- You can change directories to any location, i.e. Desktop: cd ~/Desktop
- Generate a 2048-bit private key and write it to a MyPrivateKey.pem file by typing the following command on the terminal, then pressing Enter: openssl genrsa -out MyPrivateKey.pem 2048

- Then, to extract your public key, you need to export it to a MyPublicKey.pem file by typing the following command on the terminal, then pressing Enter: openssl rsa -in MyPrivateKey.pem -inform PEM -out MyPublicKey.pem -outform PEM -pubout

- Make sure to move the MyPrivateKey.pem file to a secure location. The file does not have a password encoding it, meaning anyone can decrypt your data if they get access to this file. This key will be used by ODK Briefcase to decrypt your files.
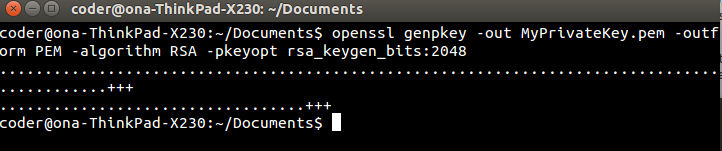
On Linux
- Open the terminal by typing Ctrl+Alt+T.
- Generate a 2048-bit private key and write it to the MyPrivateKey.pem file by typing the following command on the OpenSSL terminal, then pressing Enter: openssl genpkey -out MyPrivateKey.pem -outform PEM -algorithm RSA -pkeyopt rsa_keygen_bits:2048
- Then, to extract your public key, you need to export it to a MyPublicKey.pem file, by typing the following command on the terminal, then pressing Enter: openssl rsa -in MyPrivateKey.pem -inform PEM -out MyPublicKey.pem -outform PEM -pubout

- Make sure to move the MyPrivateKey.pem file to a secure location. The file does not have a password encoding it, meaning anyone can decrypt your data if they get access to this file. This key will be used by ODK Briefcase to decrypt your files.
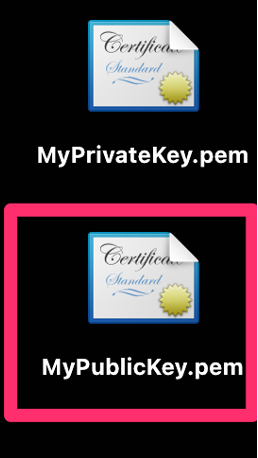
Finally, you have your two keys:
1. MyPrivateKey.pem – your private key that you need to save in a secure location. It is the key you will use to decrypt your data.
2. MyPublicKey.pem – your public key that you can share with anyone you want to be able to share information securely with. This is the public key that you will use to encrypt your data. Paste this into the public_key field in the XLSForm settings worksheet.
Below is a video tutorial that demonstrates the process of setting up encryption keys:
XLSForm syntax for encrypted forms
Follow these steps to add the correct encryption syntax in your XLSForm:
- Make sure all question variable names under the name column on both survey and choices sheet DOES NOT have characters more than 32
- Make sure you DO NOT have
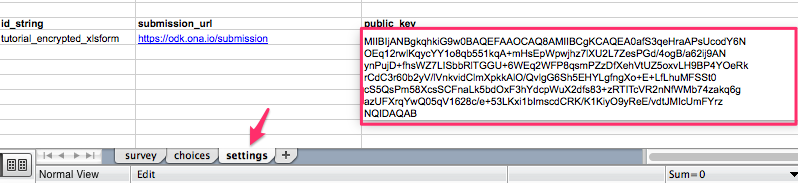
allow_duplicate_choicessettings set to yes on settings sheet - Add a worksheet called settings;
- In this worksheet, create three columns: id_string, submission_url, and public_key.
- The id_string column specifies the form id name.
- The submission_url is the url that will accept the encrypted form submissions. This is the same url that you type into the ODK Collect application under settings to download the forms from your account, which for encrypted forms should be
https://odk.ona.io/your_username. However, you must add/submissionto the end of this url (i.e.https://odk.ona.io/your_username/submission).- NOTE: This field is NOT required for encrypted forms when using Enketo
- The public_key column contains the public key (without any spaces or line breaks) that was generated using the OpenSSL software. To include the public_key:
- Open MyPublicKey.pem in a text editor (e.g. Notepad for Windows, TextEdit for OSX, and Vi/Vim Editor for Linux).
- Remove leading (- – -) and trail (…) lines and all new lines.
- Copy and paste this into the public_key field.
- Upload the XLSForm to Ona as usual. You should see a label with the text encrypted next to your form name on Ona, as illustrated in the image below:

- Download your encrypted form to your mobile phone using ODK Collect or open a web form using Enketo webforms and start collecting data!
Below is a video tutorial that demonstrates the XLSForm syntax used for encrypted forms:
How to decrypt your form
You must use ODK Briefcase to download the encrypted files from Ona and decrypt them locally on your computer using the private key generated earlier. In addition, you will also need Java Cyrptography Extension (JCE) Unlimited Jurisdiction Policy Files for decryption to be successful. Follow these steps to download ODK Briefcase and JCE and decrypt your data:
- Create a folder on your local machine to store the data once it is decrypted;
- If you haven’t already done so, download ODK Briefcase to your local machine;
- Also, download and install JCE
- Select the downloaded JCE zipped archive file in the download folder.
- Extract the files from the downloaded zipped archive folder
- Navigate to the extracted directory tree and copy the
local_policy.jarandUS_export_policy.jarfiles to the/lib/securitydirectory for Linux/OSX and\lib\securityfor Windows under the installation directory of the Java Runtime Environment (JRE) for your computer.
- Double-click the downloaded file to open ODK Briefcase;
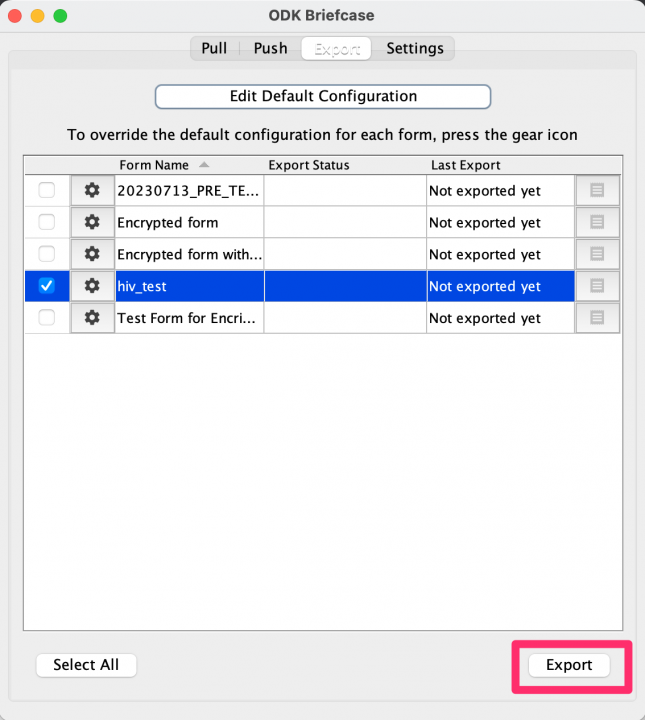
- PULL the encrypted form to your local machine. See the ODK Briefcase page for more information on how to pull forms.
- The form is decrypted only during export. Go to the Export tab;

7. Select the form from the Form list;
8. Locate the Export Directory, which is the folder you created in step 1;
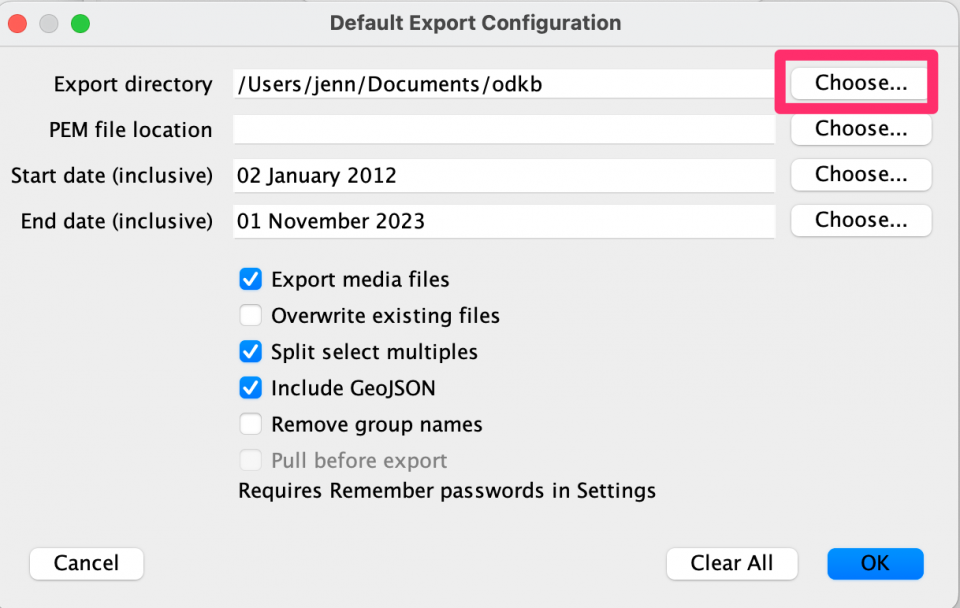
9. Search for and choose the PEM Private Key File that you generated previously;
10. Click on Export. The form data will be decrypted and exported to the folder you created in step 1
Below is a video tutorial that demonstrates how to decrypt your form:
For additional information, you can check out ODK documentation and Enketo blog on encrypted forms.
Adding form encryption from the Ona Data platform
You can also add form encryption from the form settings, as long as the form has no submissions. To encrypt the form, you will need to follow the below steps:
- Follow the above process highlighted for generating RSA encryption keys;
- Upload your XLSForm on Ona;
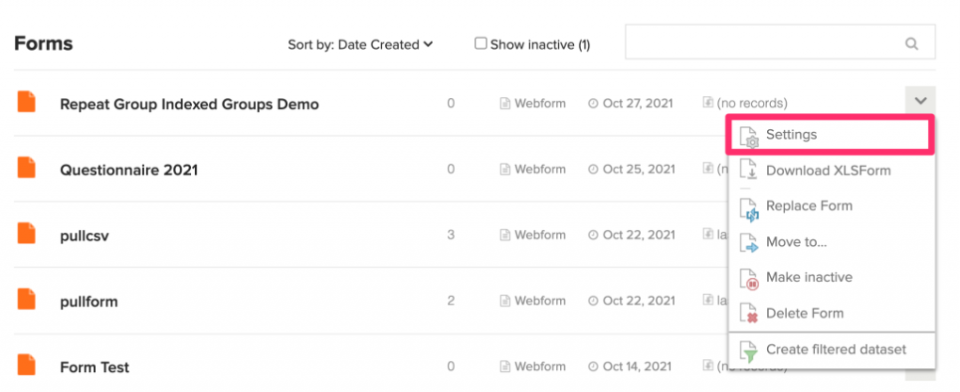
- Open the form’s settings by clicking on the drop-down on the right-hand side of the page and selecting the Settings option;
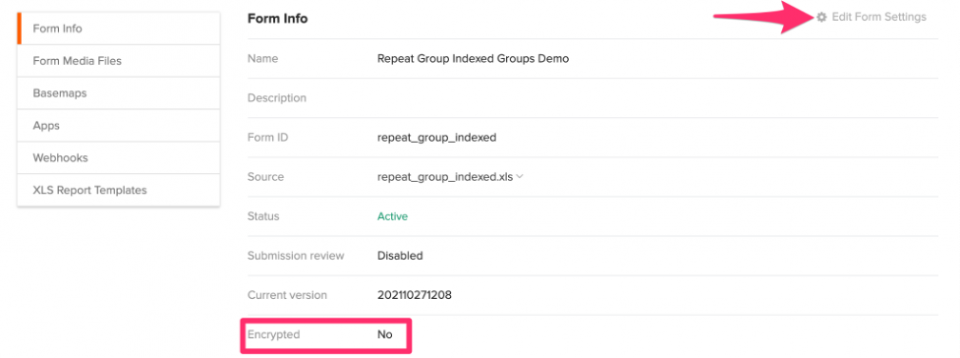
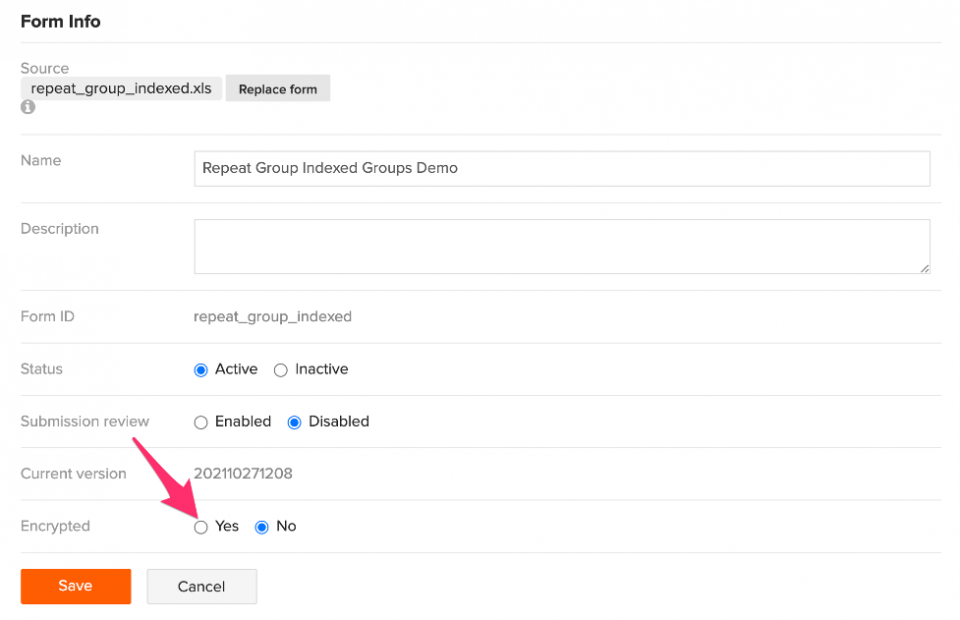
- From the form settings, you will be able to see whether the form is encrypted or not, as shown below. In this example, the form is not yet encrypted. From this page, click on Edit Form Settings;
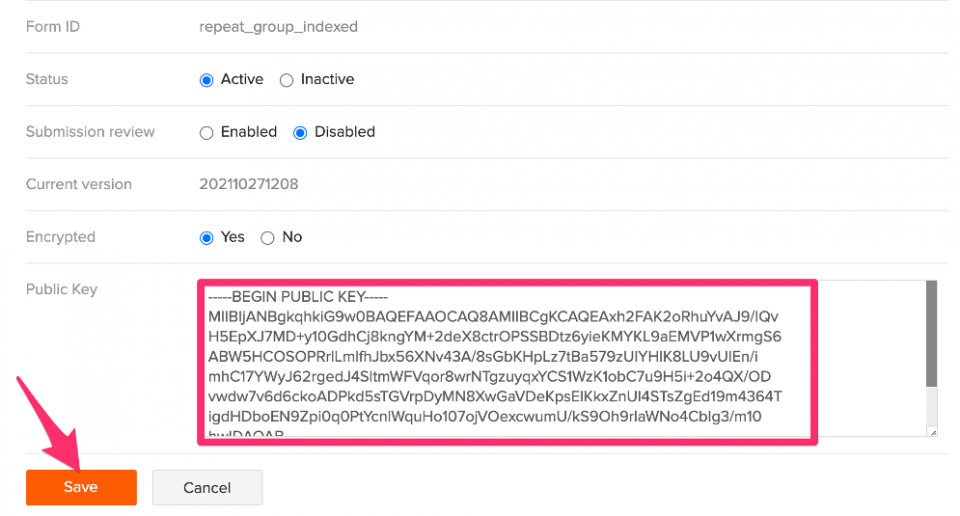
- From the Edit Form Settings page, under Encrypted, click Yes. Then, another text box for the public key will appear;
- Open the Public Key file using a text editor;
- Copy the entire key as it appears without making any changes to the file

- Paste the key into the Public Key text box, located on the Edit Form Settings page
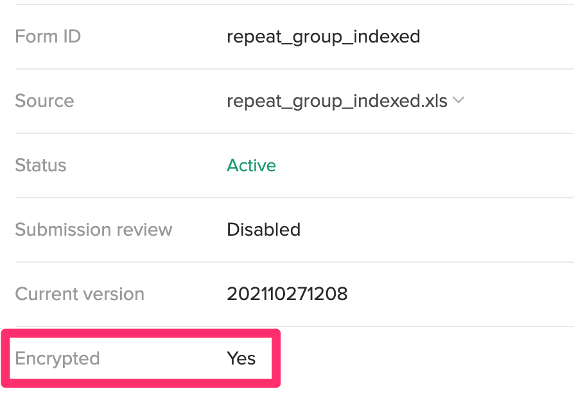
- Once the changes have been saved, the encryption status will change to Yes, as shown below;
- The form will also display with an encrypted form icon and (encrypted) text after the form title on the forms page;
