Entities allow you to share information between forms. They are especially helpful when you are collecting repetitive data or doing frequent follow-up data collection. You can easily collect longitudinal data, manage cases over time, and support other complex workflows.
An Entity is an item managed by an ODK workflow. Entities are created from submissions received in a form with entity definitions. Entities can represent physical things, such as towns or plants, and abstract things, such as household visits or facility follow-ups. Entities of the same type, i.e., entities generated by the same entity definition in a form, are organized into Entity Lists (also known as datasets).
Users create Entity definitions in XLSForms and upload the forms to Ona Data. Ona Data then manages the creation of Entities based on the submissions received in these forms. An Entity List is attached to downstream forms and can be attached to multiple downstream forms within the same project.
Entities allow you to:
- Automatically create an Entity List with a registration form.
- Use multiple registration forms that are different but target the same Entity List. For example, a form for college registration vs. a student coursework registration form.
- Use Entities in one or more downstream forms within the same project.
- Download Entities in a CSV file.
Some examples where Entities can be helpful include:
- Beneficiary registration and providing a service, such as cash payments, health visits, etc.
- Facility registration and monitoring visits, such as supportive supervision for health facility staff, medical equipment management, vaccine stock management, etc.
- Agricultural/Environmental monitoring, such as monitoring plant/tree growth, flood-prone areas monitoring, rainfall frequency, etc.
Before Entities were available, you could link a dataset as a media file (somewhat dynamic file) or upload a CSV (static file) to link to another form using the pulldata() function to pull data fields based on a unique identifier. These approaches are great workarounds but were not part of the ODK XForm specification. Entities are now officially supported within the ODK XForms specification.
Using Entities
To better understand how Entities work, let us use a practical example. Let us assume you have two forms you are working with: (1) a health facility registration form and (2) a health facility follow-up form.
The registration form captures the location and name of the health facility. The follow-up form captures the number of births in the last month since your last visit.
Let us build these two forms!
How to Build a Form that Creates Entities
Let us start by building an XLSForm capturing the registration details for a health facility (as shown below). We are calling this form the health facility registration form.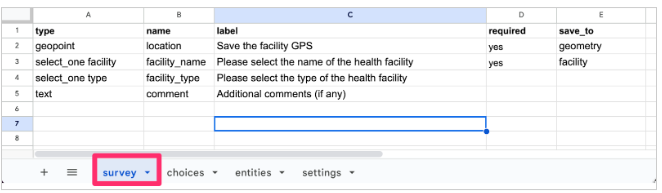
To create Entities from a form:
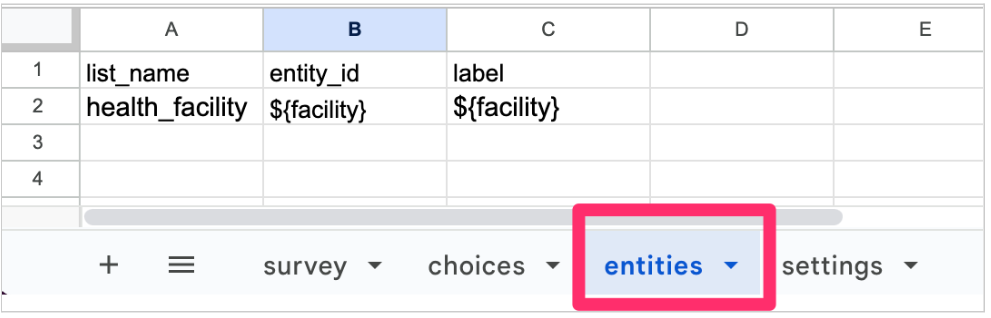
- Add a save_to column to your survey sheet. The save_to column defines how the Entity properties will be saved in the Entity List. You can think of your Entity List as an Excel spreadsheet, where each row represents a single Entity, and each column is an Entity Property.
- Define an Entity Property name. For example, from the above image, we named our Entity properties: geometry and facility. You can use the same names as in the name column or choose to use different names in the save_to column as we did in our example.
- Add an entities worksheet.
- Add a list_name column and define the Entity List name. In the example, we create new Entities in an Entity List called health_facility. This name will be used to uniquely identify the Entity List on Ona Data.
NOTE: Only one Entity List is supported per form.
- Add a label column and define the label for each Entity. The label you specify will be used to define the Entities on Ona Data when submissions are made to the form. This label will also be referenced in the follow-up forms to identify the Entities. In our example, we define the label as the facility_name, which refers to the facility selected from the choice list provided in the health facility registration form. The defined label expression can use any field in the form, even those not saved to Entity Properties, similar to the instance_name.

NOTE: If the label for each Entity is not unique (i.e. health facility x, visited on y date), you could get multiple entities with the same label (health facility x) making it difficult to differentiate between different entities.
When you upload this registration form into Ona Data, the health_facility Entity List will be created automatically.
NOTE: The Entity List will only be created if it does not already exist in the project. If the Entity List already exists, no new one will be created, and the existing one will be used by the follow-up forms.
How to Build a Form that Uses Entities
Let us create a follow up form, which consumes the Entities created from the Entity List created in the previous section.
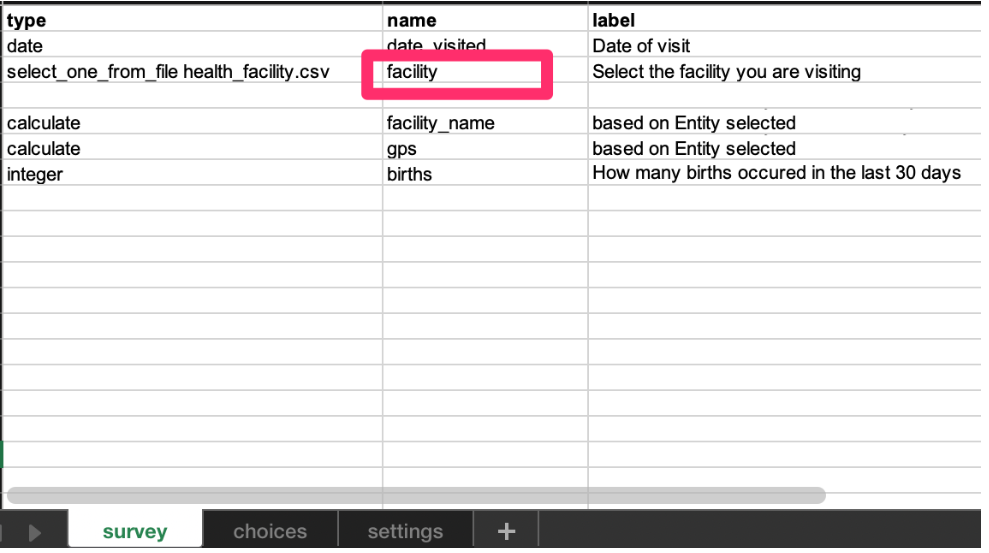
To use data from the health_facility Entity List, we reference it in the follow-up form as a CSV file using the select_one_from_file question type in the survey worksheet as shown below. You can also use the calculation column to reference an Entity’s Property from the Entity List.
In our example (shown below), we use the instance function to look up values in the health_facility Entity List. The facility data field references the facility and geometry Entity properties saved in the health_facility Entity List. 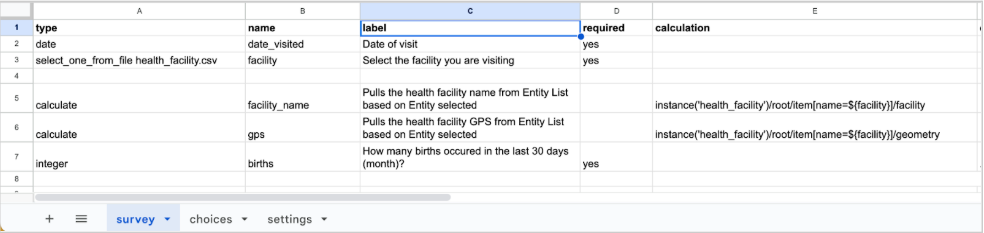
The same Entity List can be used in different forms within the same project. However, it cannot be used in a different project.
See below a video showing how to apply Entities to XLSForms.
How Entities work on the Ona platform
- Create a project or use an existing project you have.
NOTE: If this is your first time using entities, we recommend creating a new project to simplify and minimize possible external confusion.
- Upload the health facility registration form, which we built in the previous section to your project. The Entity List health_facility is created automatically in the project.
- Upload the facility follow-up form, also created in the previous section, to the same project as the health facility registration form. The follow-up form does not make any changes to the Entity properties. It only consumes the health_facility dataset.
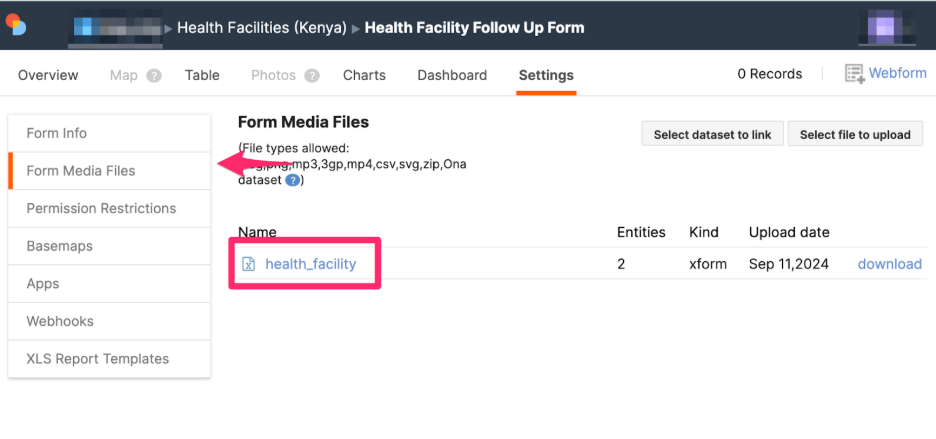
- When you navigate to the follow-up form’s Settings page, under Form Media files, the dataset health_facility, created in Step 2, appears. No file needs to be attached or linked.
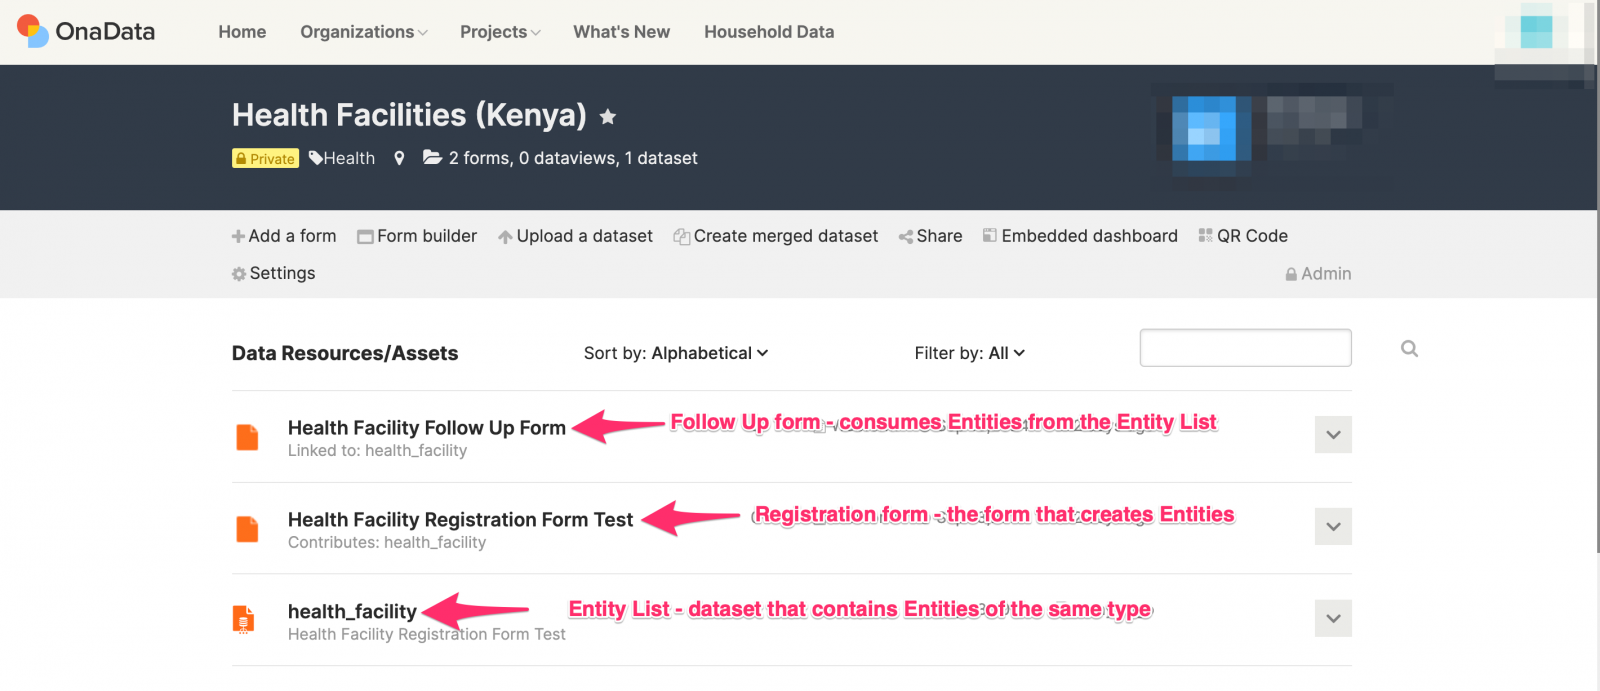
- Once the registration form and the follow-up form are uploaded, your forms should be listed as shown in the screenshot below.
How the forms work together
Check out this video showcasing how the forms work together with Entities on the Ona Data Platform.
When collecting data, Entities can be used on both ODK Collect and Enketo webforms. The Entity List will download and needs to be updated similar to other media attachments for data collection tools.
The Entity List is updated in the background when the registration form receives submissions. When using ODK Collect, you will need to navigate back to the form listing page and update the forms so that you can fetch new entities added to the Entity List.
Let us see how the forms work together! We will load the forms in Enketo webforms.
- Load the health facility registration webform and fill in some records and submit.
- Navigate to the health facility registration form’s Overview page to confirm the submissions have been added to the form.
- Navigate to the health_facility dataset Overview page to verify that the number of Entities has increased. For example, if there are 2 submissions in the registration form, there should also be 2 Entities in the Entity List.
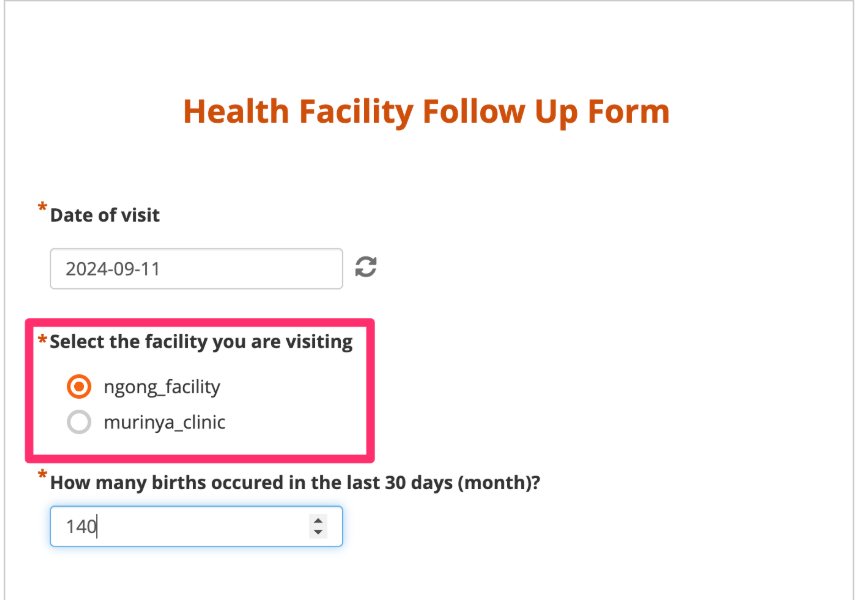
- Load the health facility follow-up webform. You will notice a list of answer choices, which are the Entities saved to the Entity List when the registration form was receiving submissions. Select an option, add the date of visit, add the number of births at the facility in the last 30 days (month), and submit the record.
Below is a video illustrating how the forms work together on the Ona platform.
Updating Entities
How to Update an Existing Entity
To update Entities, you need to specify which Entity properties will be updated in your XLSForm. When Ona Data receives updates to Entities from form submissions, the changes are applied to the Entity List. Users can access the newly updated Entities/Entity List on ODK Collect and Enketo once they synchronize their forms with Ona Data.
NOTE: When your form allows others to update Entities via filled form submissions, two users may update the same Entity at the same time during data collection. In such cases, Ona Data will make the updates to the Entity sequentially as the data is received. The last update received will be the latest update to the Entity. This can be confirmed by checking the date column to see the last received update.
How to Build a Form that Updates an Entity
Updating an Entity is similar to creating a new one. In this example, we are going to update an Entity defined in our health facility registration form.
- In the form updating Entities in a specific Entity List, you need to add an entities worksheet and an entity_id column to specify the Entity instance you want to update. This field should be the same as the data field used in the name column in the select_one_from_file question referencing the Entity List.
In our example, we want the facility selected in the follow up form to update the original Entity created in the health facility registration. Therefore, we will use the field name facility in the entity_id column, for the selected facility in the follow up form, to select the Entity we want to update in the health_facility Entity List. The facility holds the ID for our list of health facilities.
- In the same form, add a save_to column in the survey worksheet. You can update any Entity property by referencing the same Entity property name in the save_to column. In our example, the births questions will update the births Entity properties in the health_facility Entity List.
NOTE: You can also update the label of an Entity via a form. Add the label column and how the Entity label will be updated in the entities worksheet. This is similar to setting the label column when creating an Entity.
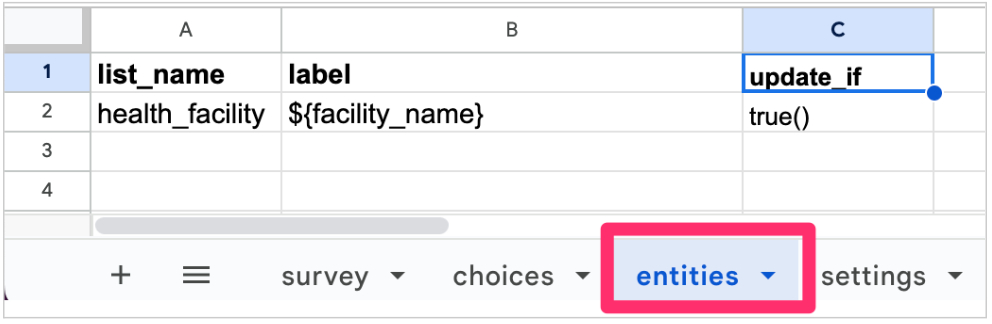
Setting Conditions to Update an Entity
In a form updating an Entity, optional conditions can be added to your form to determine when an Entity is updated by adding an update_if column in the entities worksheet. You can add an expression or use a function, like true(). true() means the Entity will always be updated when a submission is received. When an expression is used, the Entity will only be updated when the expression evaluates to true.
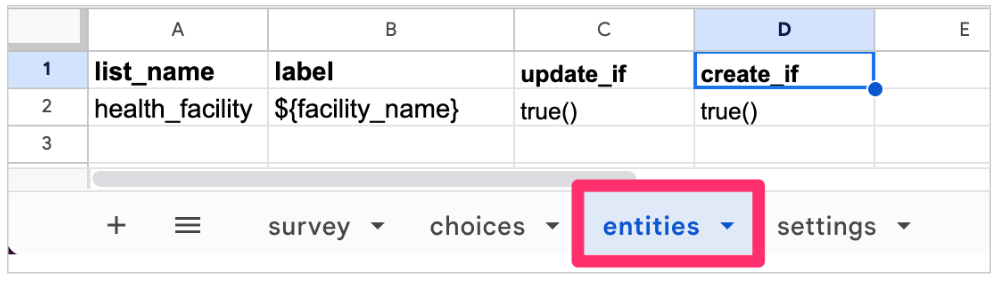
How to Create and Update an Entity using one Form
You can create a form that both creates and updates an Entity.
To do this, include both a create_if and update_if column in the entities worksheet. Specify the condition to create an Entity in the create_if column and to update an Entity in the update_if column. It can be an expression or function, as when you were updating an Entity.
If only one of the expressions in the update_if or create_if evaluates to true, then only that operation will be executed. If both rules evaluate to true, the Entity will be created if it does not exist (this is identified by the Entity_id expression), and it will be updated if it exists. If neither rule evaluates to true, there will be no changes made to the Entity.
Managing Entities
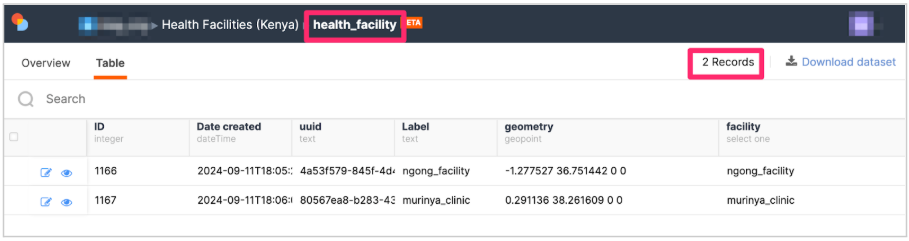
Entity Lists created in a project are listed under the Data Resources/Assets section. The image below depicts the health_facility Entity List as it appears in Ona Data.
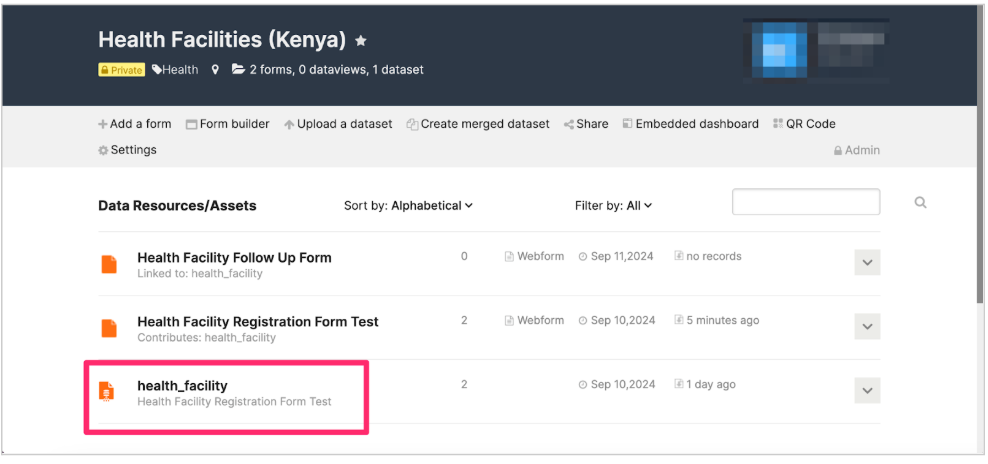
An Entity List is denoted by a list icon. No data can be submitted to it, hence the absence of the webform icon.
Clicking on an Entity List opens the Entity List page which has two tabs: (1) the Overview tab and (2) the Table tab.
Overview Tab
The Overview tab gives a general summary of the Entity List.
- Activity – This shows the number of records (Entities) in the Entity List.
- Connections for forms – These are details about all forms linked to the Entity List or Dataset and forms creating/updating the Entity List and consuming data from that Entity List.
- Dataset properties – These are the properties that define the Entity List.
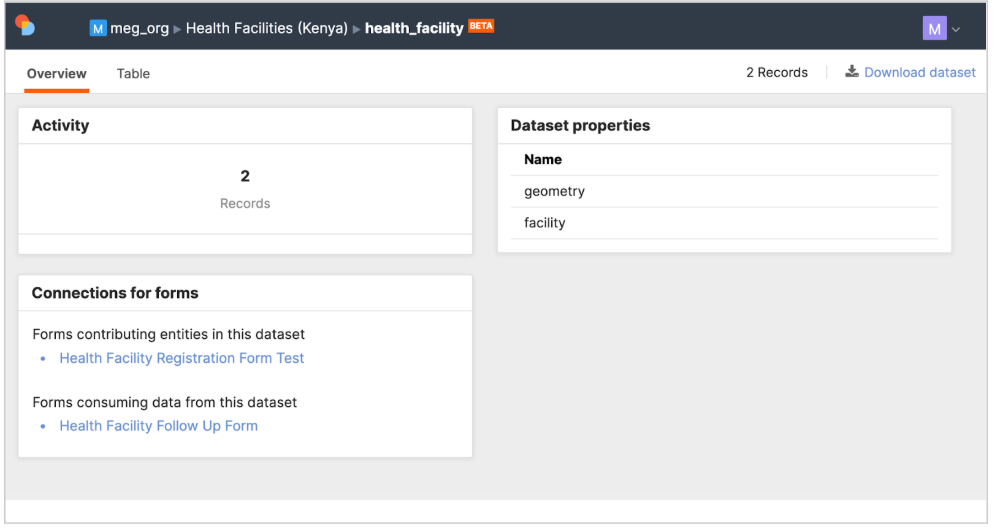
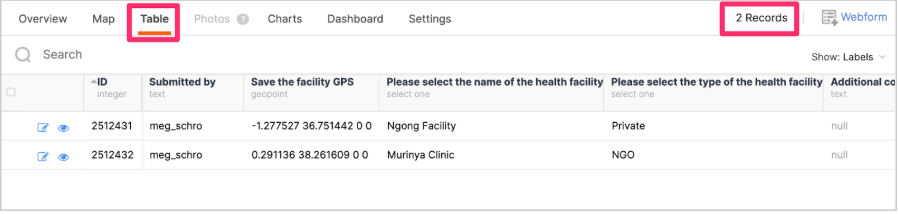
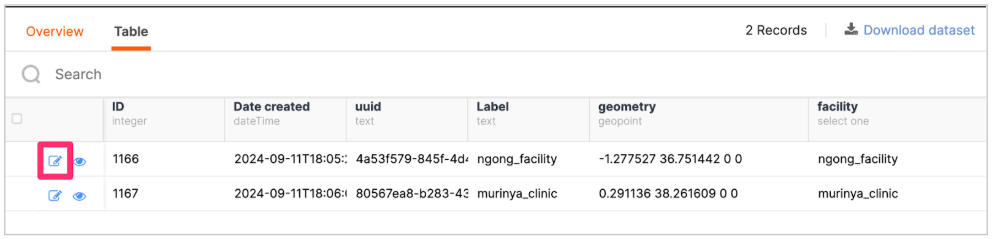
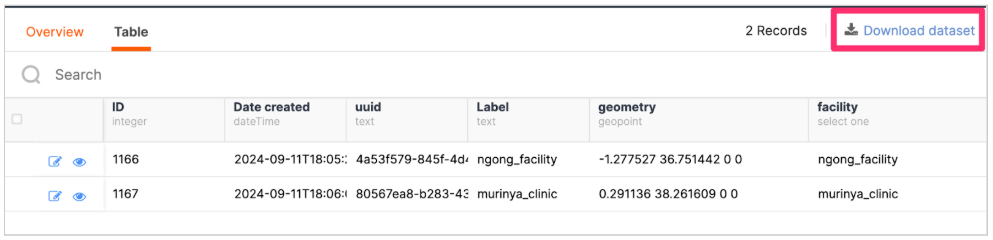
Table Tab
From the Table tab, you can see details of individual entities in the Entity List. You can search, edit, or delete individual entities and download entities in a CSV file. Each Entity also includes metadata, such as ID or Date created. The Entity data is displayed similarly to the submissions in a form.

Entity Data Management
Editing Entity Data
A single Entity can be edited by clicking on the pencil icon.
This opens the Entity in a small window, where you can make changes and save them. Metadata fields, like UUID, Date created, and ID are not editable. 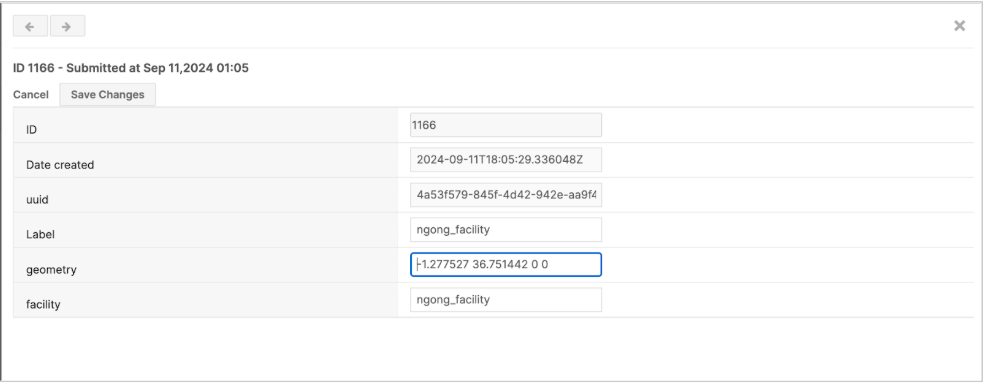
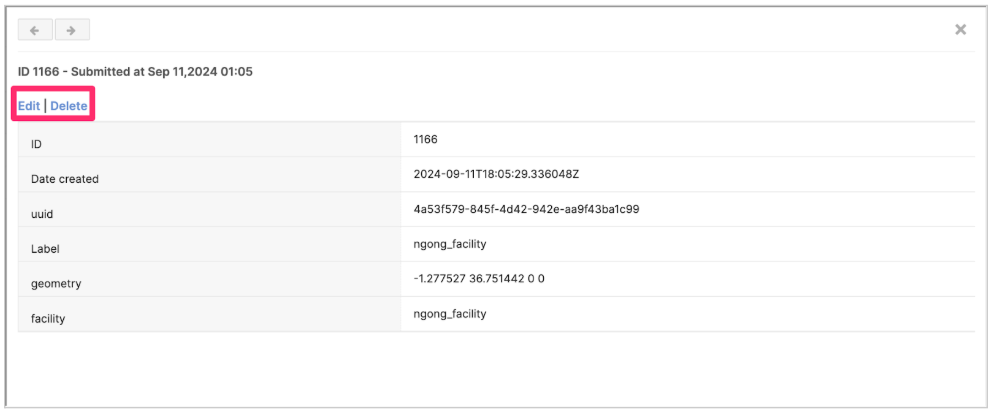
The view icon allows you to open the expanded view of an Entity.
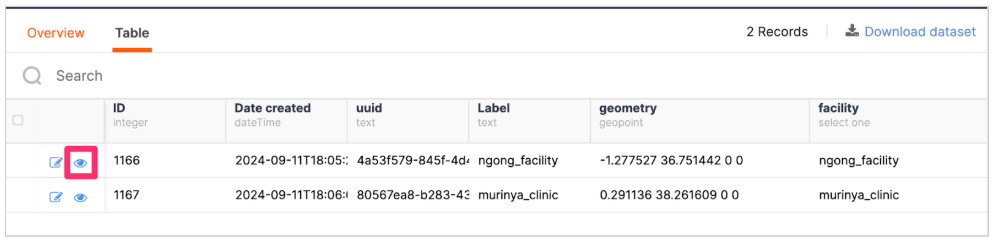
You can also edit or delete the Entity from this single Entity view modal as highlighted in the screenshot below.
NOTE: Editing the parent submission in the form that created the Entity List does not update the Entity, unless the form is designed to update Entities. See the section on updating Entities for more information.
Downloading Entities
You can download the Entities from the Download dataset menu. This will download them as a CSV file.
Deleting Entity Data
Deleting multiple records
To delete multiple records, select the checkbox in the header column to select all the records on a page. Click on Delete Selected on the top right, and then follow the steps in the confirmation modal that pops up.

Deleting a single record
To delete a single Entity, select its checkbox, click on Delete Selected, then follow the steps to confirm deletion.

You can also delete a single Entity by clicking on the view icon of the record and selecting Delete on the single entity view modal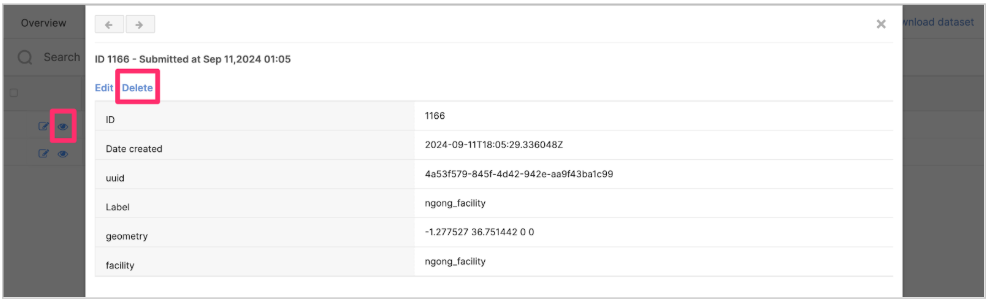 .
.
Note: Deleting an Entity does not delete the parent record from the registration forms. It only deletes the Entity from the Entity List. Similarly, deleting a record from the registration form does not delete the Entity created by that record.
Troubleshooting forms with Entities
It is possible to have an empty Entity List created shortly after a form with Entity properties defined is uploaded to the Ona platform. However, you cannot test the application of Entities in a follow-up form until you have submitted records to form creating the Entities.
Troubleshooting Common Error Messages
- Wrongly labelling a column on the entities worksheet.

The error above implies you have a wrong column name on the entities worksheet. To resolve this, ensure the first column is the list_name, followed by the label column. Refer to this section on creating an Entity or Updating an Entity for more details on other columns that can be included.
- Currently, Entities are not supported within repeat groups therefore, a form that contains Entity properties within a repeat group will throw an error during form upload.
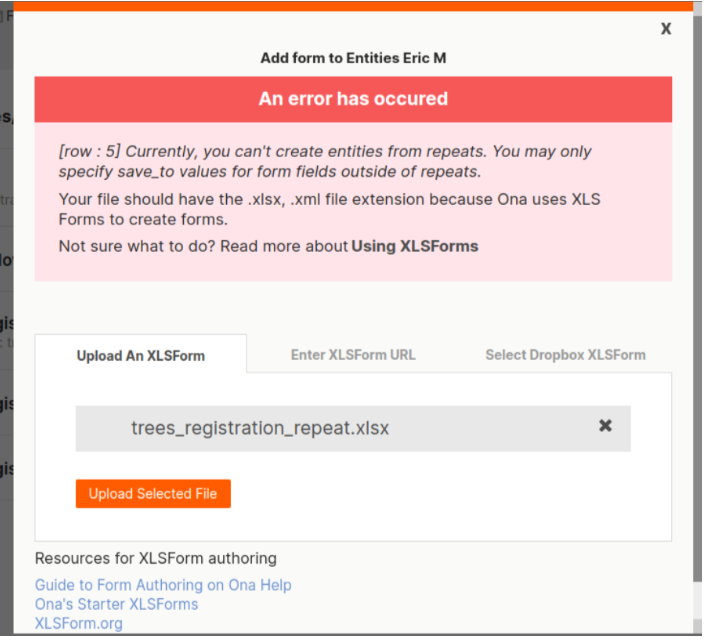
The solution is to remove the Entity properties from the repeat group in the XLSForm that creates the Entities. 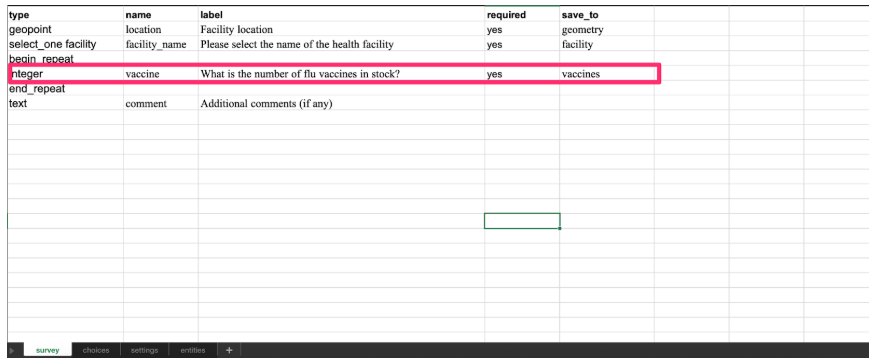
For example, in the above screenshot, the property vaccines will need to be saved outside the repeat group for the form to be uploaded successfully.
Limitations when working with Entities
- Entity creation and update require an Internet connection.
- ODK Collect or Enketo web forms will have degraded performance when you have a large number of entities. Expect to notice the performance degradation when the number of Entities are above 50,000.
- All devices that are connected to your project that contain the EntityList, will always download all the forms that depend on the EntityList. This could potentially be a privacy concern.
- Entity properties and values are of the type string and will only be stored and presented as a string.
- Entities do not work with repeat groups. If a repeat group is in the registration form, an error will be thrown. See this section on types of errors.