What are Ona Apps?
Ona Apps are powerful integrations that let users connect and grant data access to external apps. Currently, integrations with Google Sheets, RapidPro, TextIt, Tableau, and Tableau Hyper are supported. The Ona Apps were released in July 2016. Below, we go over how to get started connecting Ona with Google Sheets and RapidPro.
Note:
Ona Apps are included with select paid plans. Please email sales@ona.io if you’re interested in hearing about plans.
Google Sheets
As an Ona App, the Google Sheets integration allows you to sync data directly from your form in Ona to a spreadsheet in Google Sheets. Your connected spreadsheet is automatically updated whenever new form submissions are sent and when edits are made to existing form submissions.
There are two ways of exporting data to Google Sheets: 1) Connecting a form to Google Sheets, or 2) Direct export to Google Sheets.
1. Connecting a form to Google Sheets
You can export data to Google Sheets by creating a connection between a form and a spreadsheet. This way, data that has already been submitted to your form in Ona will be synchronized to a Google Sheet. Additionally, any incoming form submissions will automatically be pushed to Google Sheets.
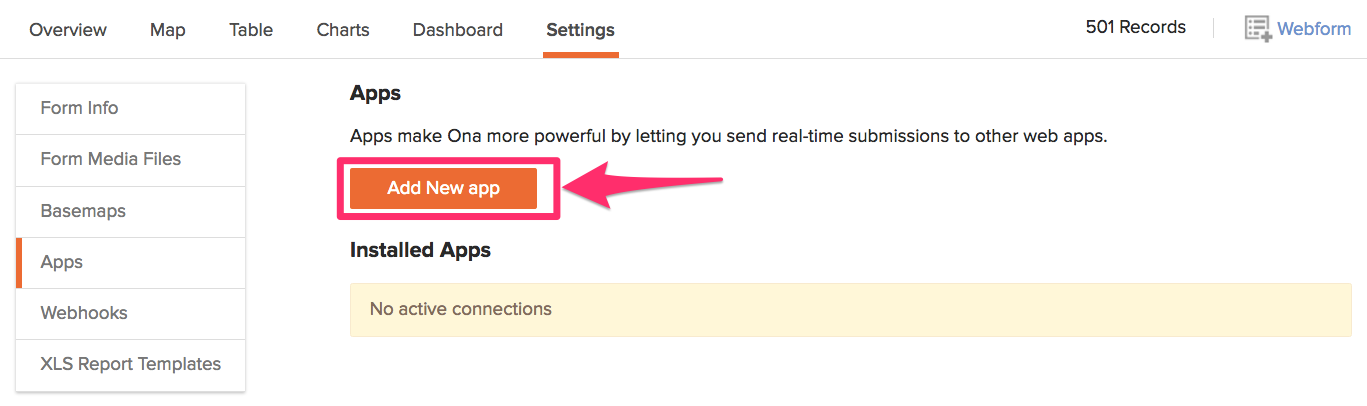
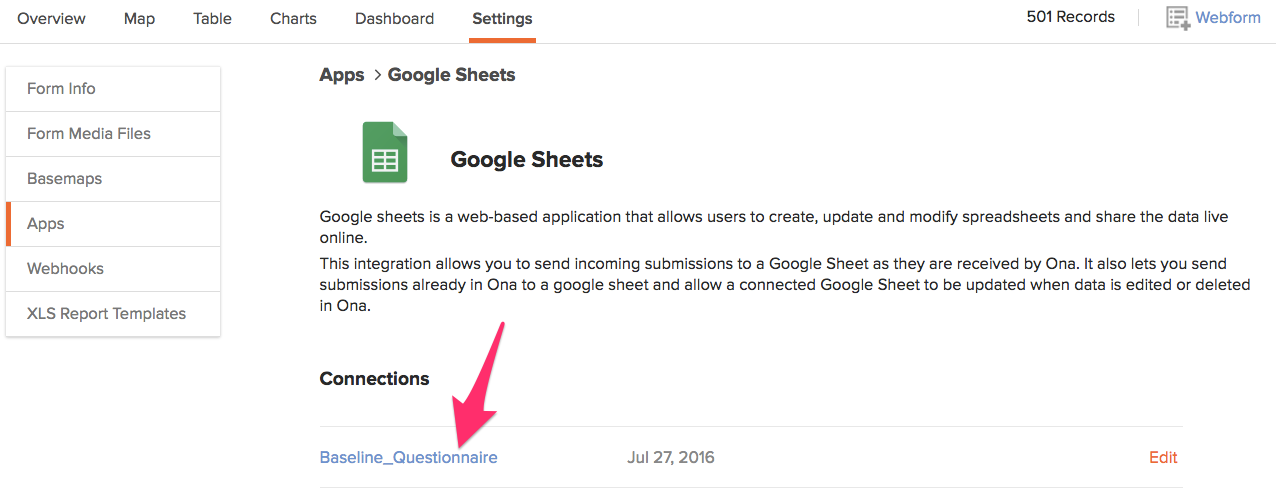
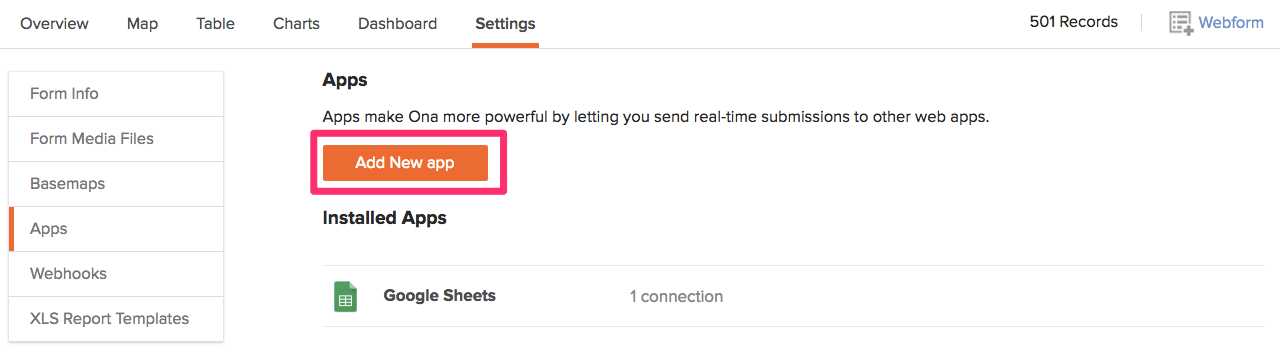
To connect a form to Google Sheets, go to the form’s Settings page and click on the Apps tab.
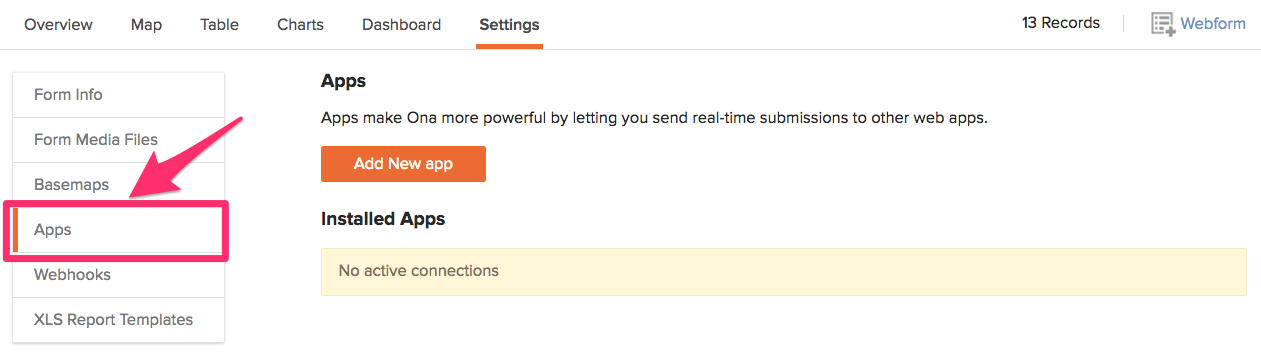
Click on Add New App button to launch Ona Apps.
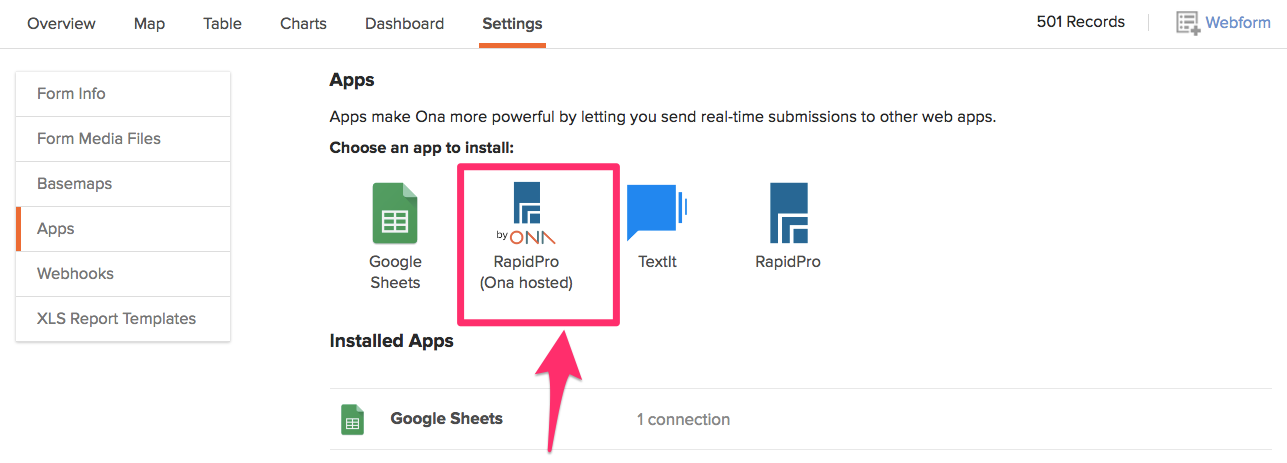
From the Apps listed, click on the Google Sheets icon to install it to your account.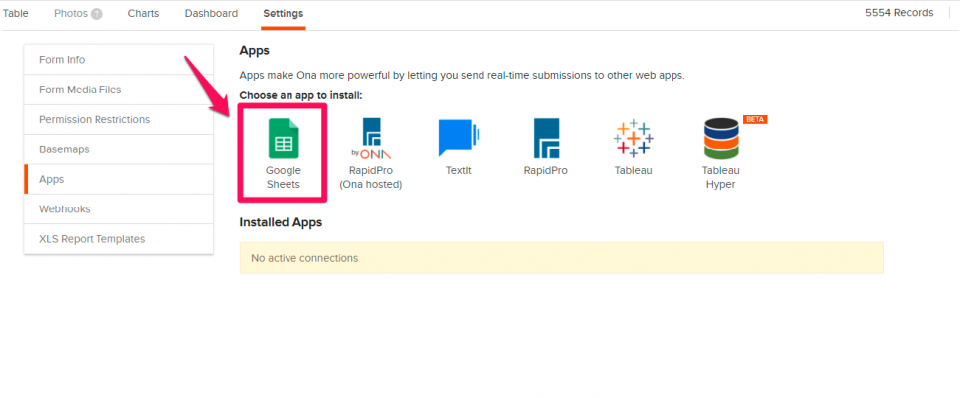
A page will pop up where you define how your connection will work. On the checkboxes, check all boxes if you want your connection to send new submissions, edited records, and deleted records. Then, click on the Save button at the bottom to connect the form to your Google Drive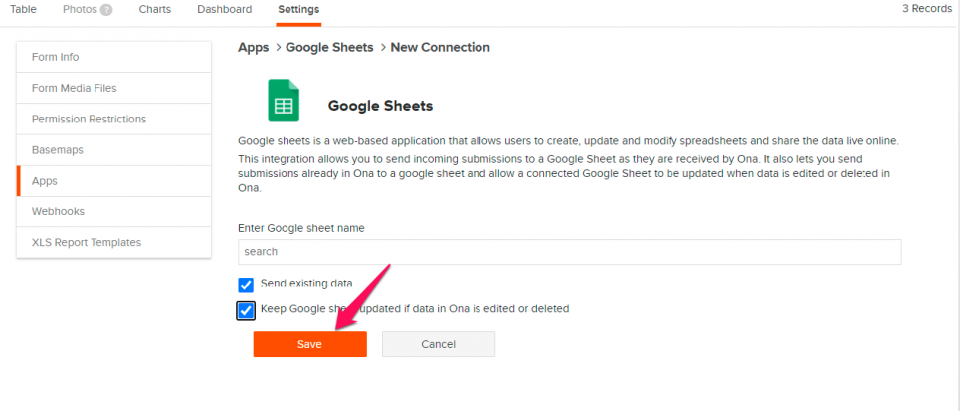 .
.
If you get a notification in your address bar marked Pop-up blocked, select Always show pop-ups from ona.io and click Done to proceed.

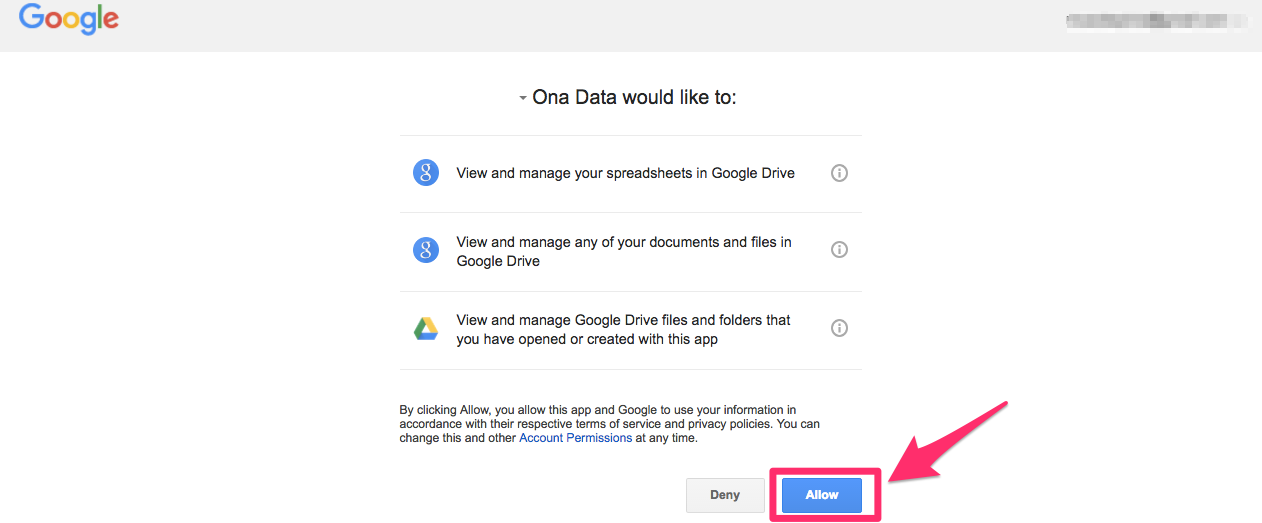
You will be redirected to your Google Account, where you’ll be prompted to authenticate by providing login details. This will allow Ona to send data to your Google Drive.
Finally, you’ll be redirected back to the form’s Settings page.
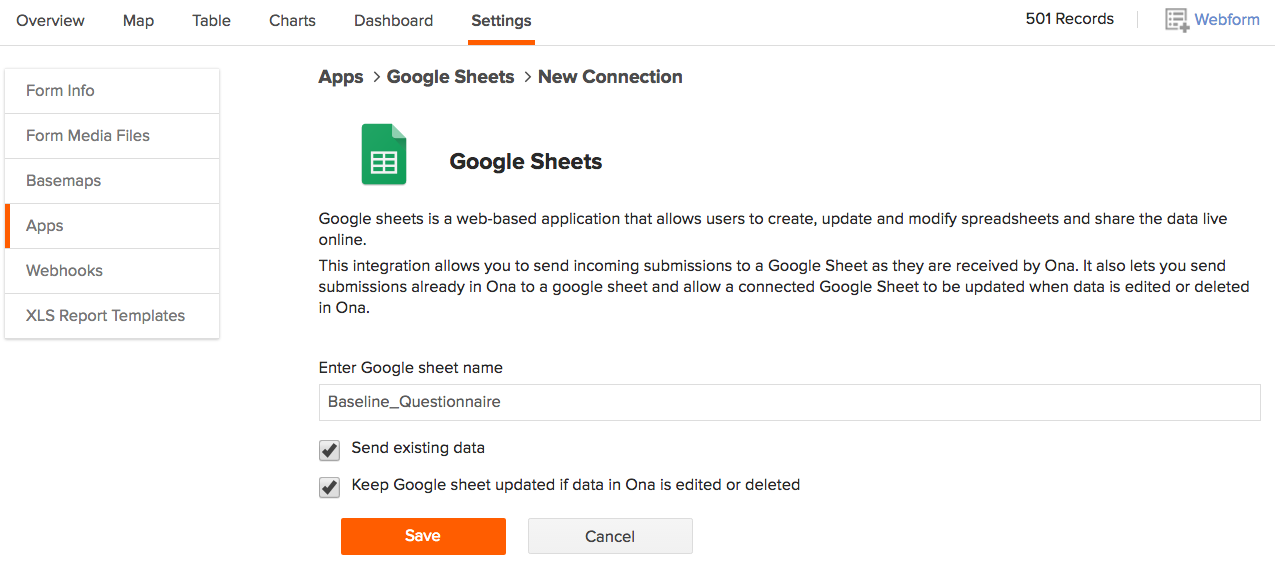
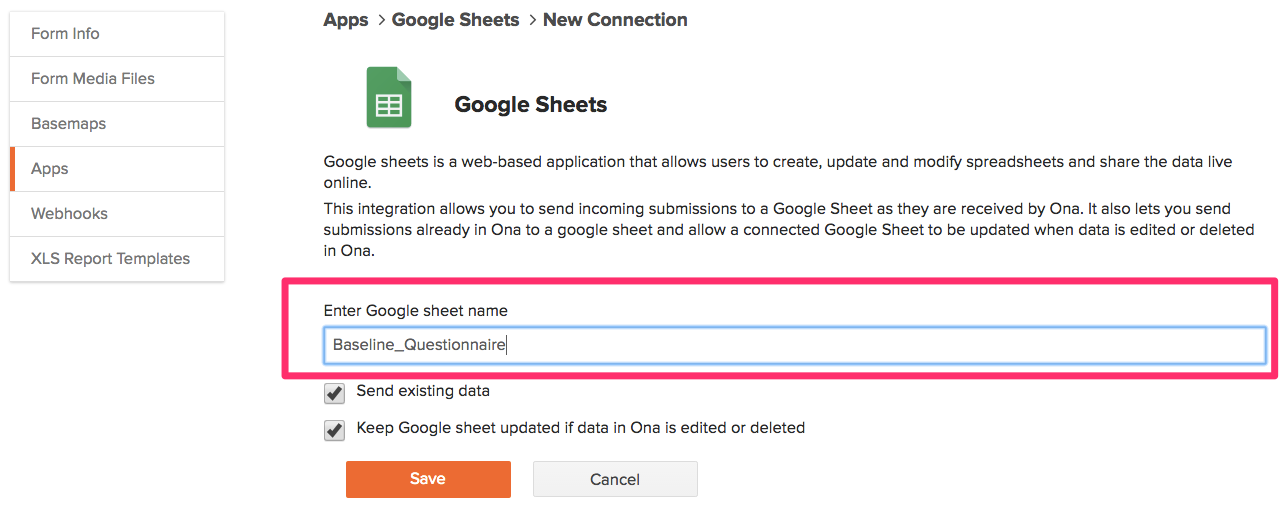
If you wish, edit the name of the new Google spreadsheet in the Enter Google sheet name textbox.
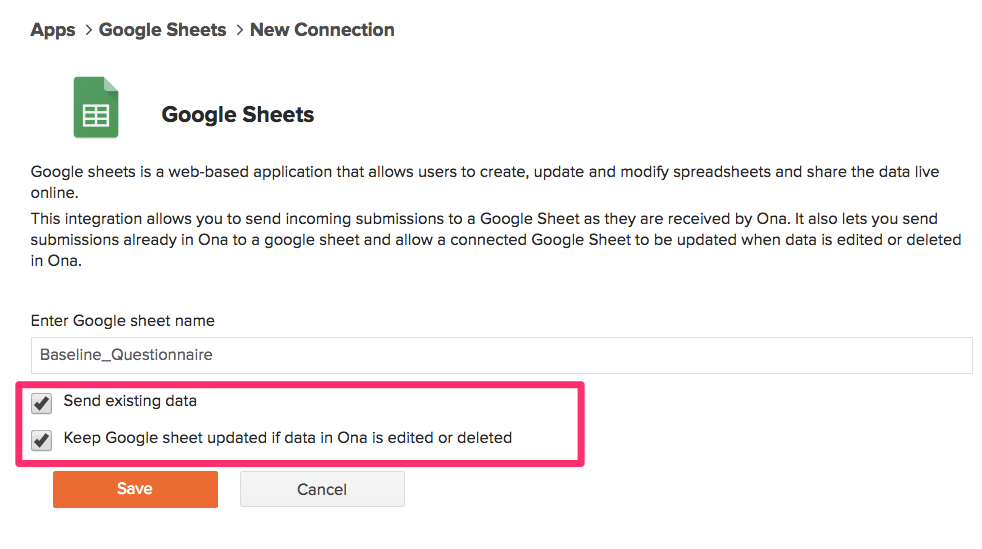
Selecting the Send existing data checkbox will sync existing Ona data to the spreadsheet. Selecting the Keep Google sheet updated if data in Ona is edited or deleted checkbox keeps your Google spreadsheet updated with changes made to the dataset in Ona. Selecting both will ensure that your Google spreadsheet is synchronized to your data on Ona as you make edits and new data is submitted.
Note:
Google account authentication is only done once, subsequent form connections will not require authentication since your Ona account is already connected to your Google account.
To access the created connection, click on the Google Sheet connection form title link under the Connections section.
2. Direct Export to Google Sheets
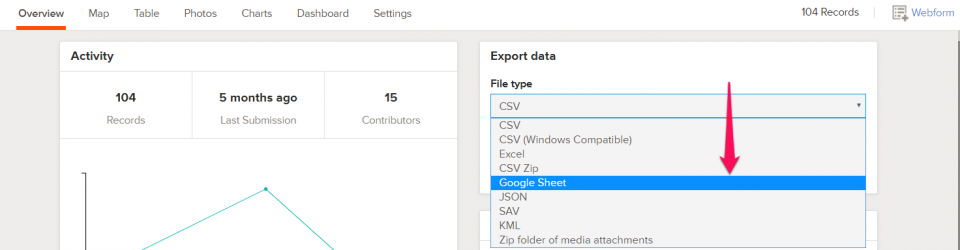
This is a one-time data export in Google Sheets format from the form’s Overview page. Go to the Data Exports section and click on the Prepare Data Export button.

The Export Data view will appear. From the File type drop-down menu, select Google Sheet.
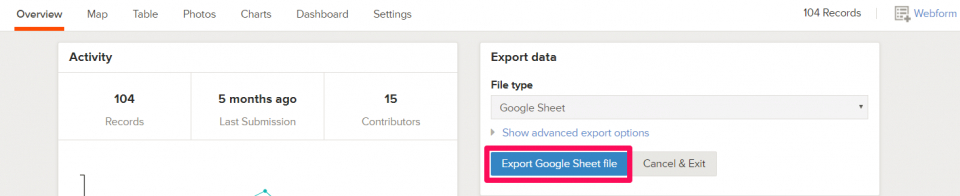
Then, click on the Export Google Sheet file button to prepare your export.
When exporting data to Google Sheets for the first time, a dialog box will pop up to prompt you to authorize Ona with your Google account.
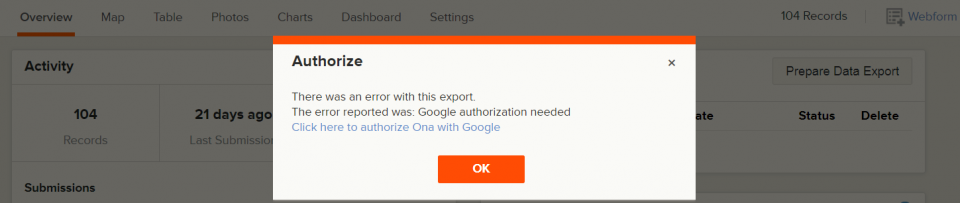
Click on the link to provide authentication to your Google account as explained above. Once Ona is authorized with your Google account, you can export data to Google Sheets.

Note:
Repeat groups data: each repeat group will be in a different worksheet, but uniquely indexed to the appropriate parent unit of observation, similar to Excel data exports.Connections are form based and not project based: connections only apply to specific forms and not the entire project. You’re required to create a new connection for every form within your project.
Ona Apps connections are not yet supported for filtered datasets .
RapidPro
What is RapidPro?
RapidPro is an open-source messaging platform that allows users to visually develop SMS and IVR messaging flows. As an Ona App, this integration makes it possible to push form submissions in Ona to a connected RapidPro (or TextIt) flow. This integration works with the Ona-hosted version of RapidPro (rapidpro.ona.io) and other versions of RapidPro and TextIt. You can read more about RapidPro on the RapidPro community website.
This integration is a powerful tool you can use to do any of the following:
- Transmit incoming data from your Ona account to RapidPro or TextIt to trigger SMS or email alerts;
- Register people automatically in RapidPro or TextIt for SMS follow-up;
- Use SMS or IVR as a supplemental way to capture data in addition to digital forms in your Ona account; and
- Create other useful notifications.
Getting Started
To get started using RapidPro, create an Ona-hosted RapidPro account at rapidpro.ona.io by entering your email address, and then clicking on the Create Account button. Fill in information about yourself, then choose a name for your organization and select your timezone.
Account Credits
Each new RapidPro account is automatically given 1,000 free credits to get started with. Email sales@ona.io for more information on purchasing additional credits for your Ona RapidPro account. Accounts with 100,000 credits or more have the ability to add additional users to the organization account with various permission levels.
Creating Flows
Once you have created an account, you can begin creating flows in the flows tab. Your flows define the SMS or IVR interactions and follow-up actions with your contacts. Please visit the RapidPro documentation site for more information on creating flows.
Adding a Channel
Adding a channel to your RapidPro account allows RapidPro to send and receive messages or phone calls on your behalf. Your account can have multiple channels. An Android phone is one type of channel you can use with your account. For more information on the other types of channels, you can set up, visit the RapidPro article on channels.
To connect your Android phone as a channel in your RapidPro account, start by installing the RapidPro application on the device.
To connect the device to your Ona RapidPro account, you will need to change the IP address to rapidpro.ona.io in the RapidPro app settings.
- Tap on the app menu bar several times until the settings menu button appears on the screen.
- Press the Menu button, then scroll down to Advanced Settings

- Tap on IP Address and then change the address to rapidpro.ona.io.

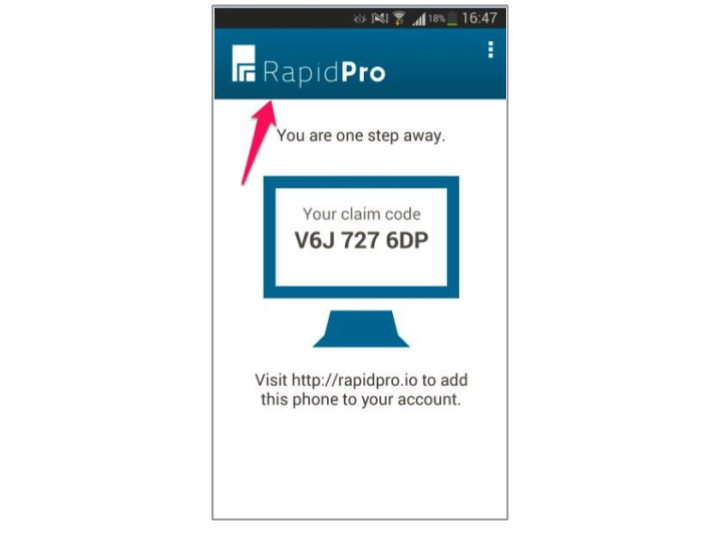
After doing this, you will receive a new claim code, which you can enter on the channel settings page in your RapidPro account. Please refer to this documentation for more information on how to add channels.
Passing Form Submissions to a Flow
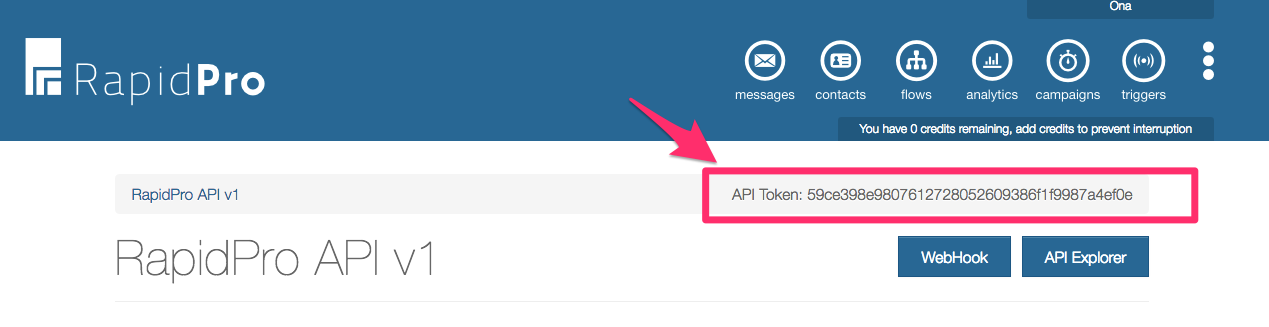
To push form submissions from Ona to a Rapidpro flow, you will be required to connect your form to your RapidPro account by providing the API token for your RapidPro account. You can obtain the API token at https://rapidpro.ona.io/api/v2 while you are signed in to your RapidPro account.
Connecting a Form to Rapidpro
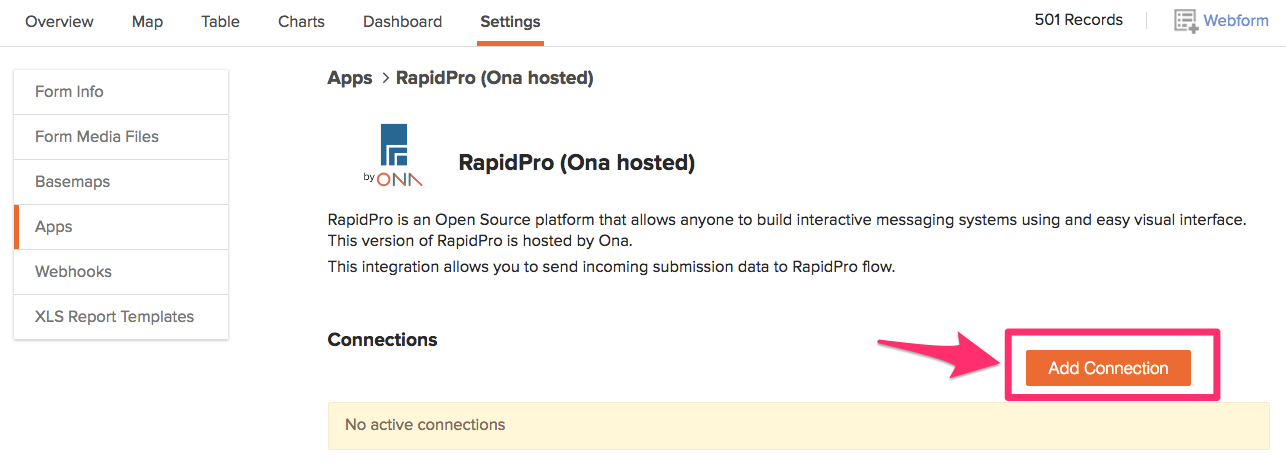
To connect a form to RapidPro, go to the form’s Settings page on Ona, then click on the Apps tab:
Click on the Add New App button to view the list of possible app connections.
From the apps listed, click on the RapidPro (Ona-hosted) icon if you are connecting Ona to a flow from Ona-hosted RapidPro. Click on the RapidPro option if you are using RapidPro hosted elsewhere.
Then click on the Add Connection button to connect the form to your RapidPro account.
You will be prompted to enter your RapidPro (Ona hosted) API Key that you obtained earlier. Once you have entered the API key, click on Next to proceed.
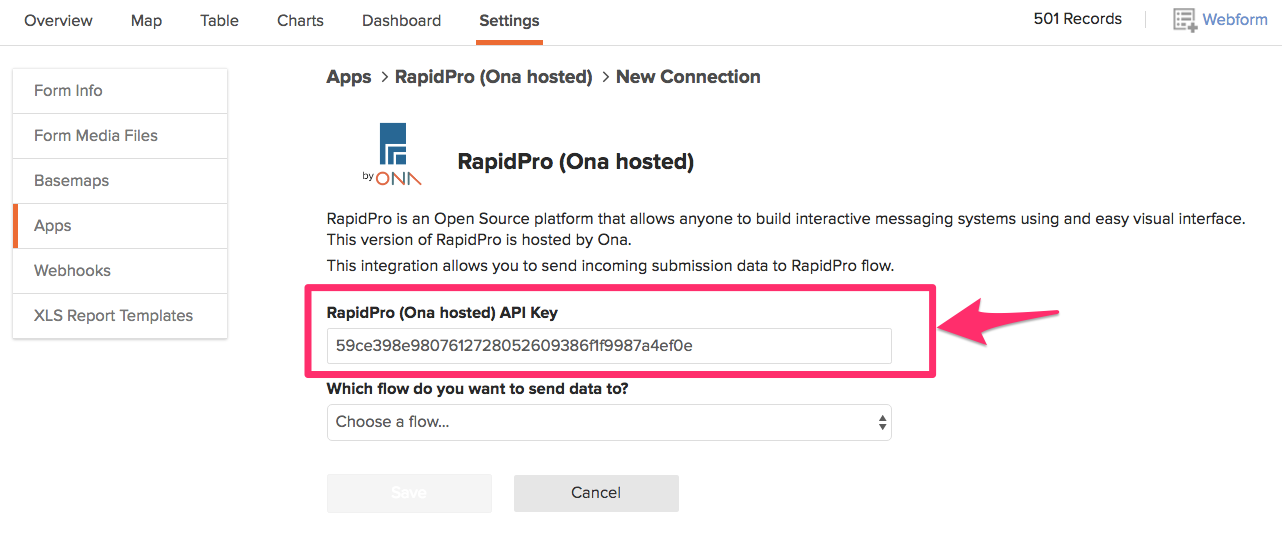
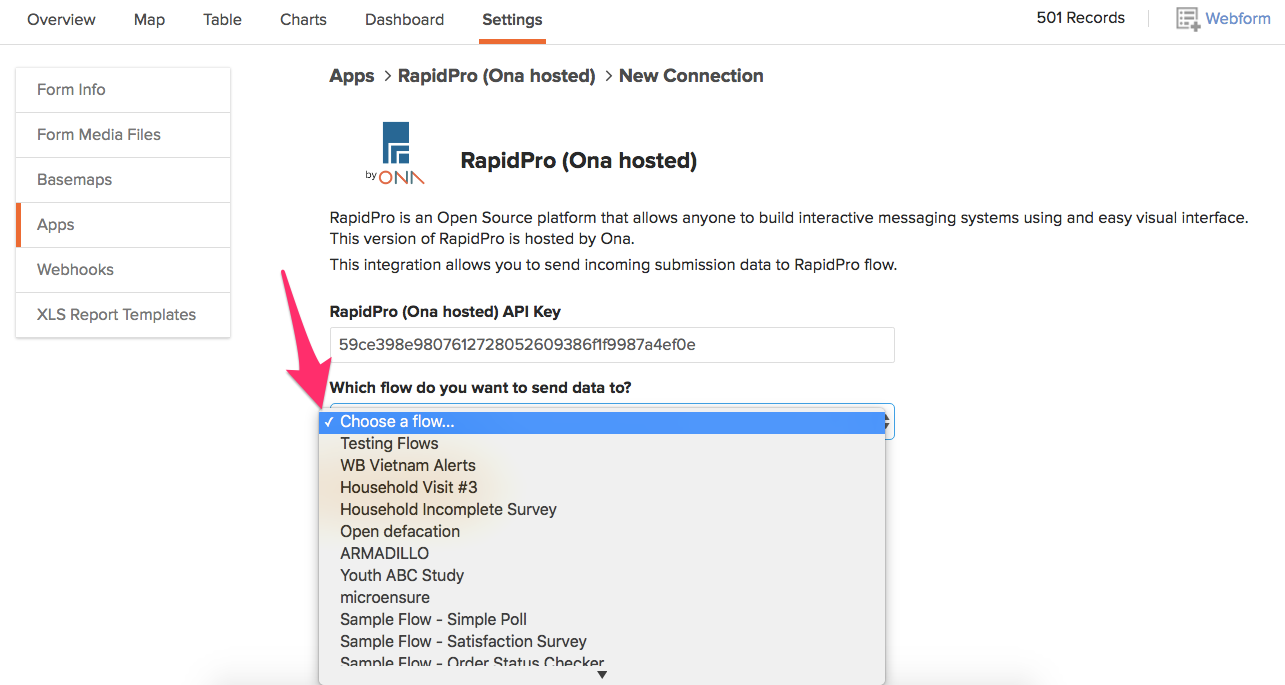
Select the RapidPro flow from the dropdown that you want to connect your form to, then click Save. Incoming submission data will be sent to this flow.
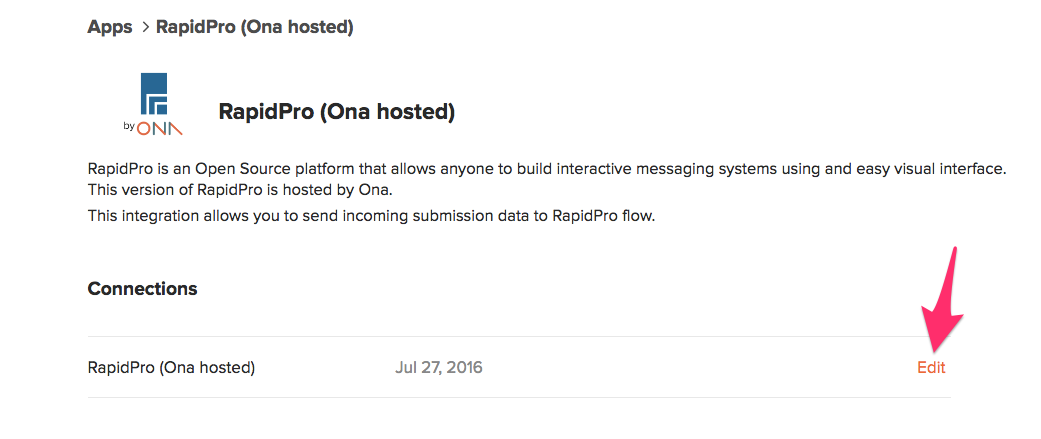
Once you’re all done, the RapidPro connection will appear under the Connections section on the page.

To make edits, click the Edit button on the right side of the connection. This will redirect you to the Edit Connections page where you can edit the connection settings.
Important points to consider:
You can use the function
@trigger.params{field-name}in your flows to reference data from the form submission.For fields in groups, use the function
@trigger.params{group-name}_{field-name}. Make sure to use an underscore as the separator between the group and field name.Deleting a connection stops new submissions from going to your flow but does not delete your flow.
Rapidpro flows are triggered by new form submissions only and not edits to existing submissions.
For complete documentation on RapidPro, visit the RapidPro documentation website.
Note: This feature has the following limitations:
- no retries in the event of failures
- no logs
- no status of failed or successful execution of the web service
How to Access your API Token
The API token is a unique key that allows you to authenticate and interact with ona.io programmatically. This guide will walk you through accessing your API token on Ona.io.
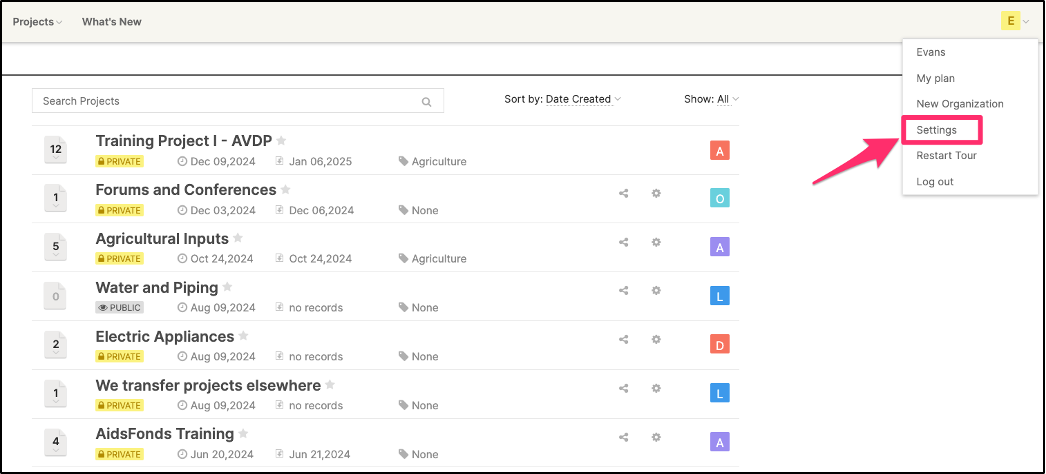
Once logged in, hover your cursor over the profile icon in the top-right corner of the screen, and click on Settings.
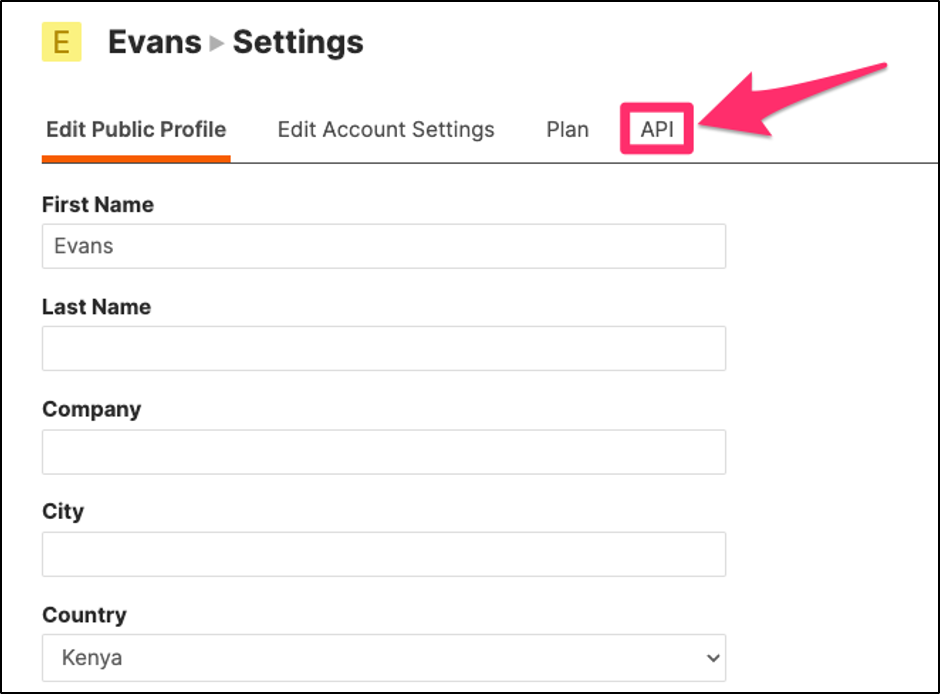
On the Settings page, click on the API section.
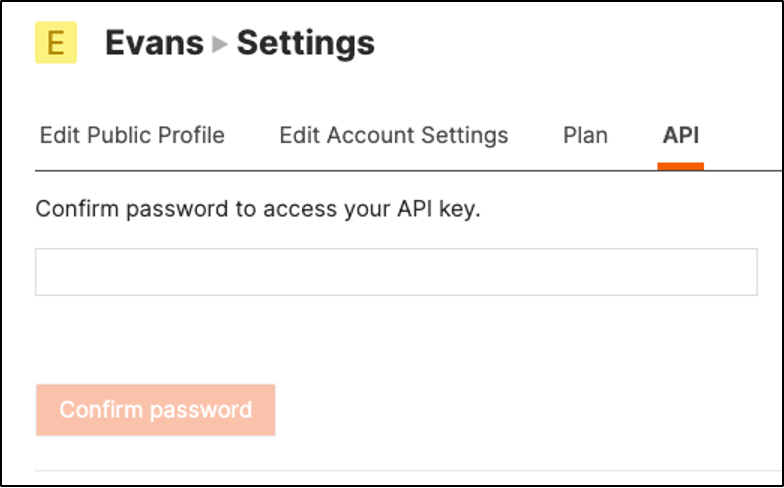
Enter your account password to obtain the API token:
Your API token will be displayed as a long list of characters.
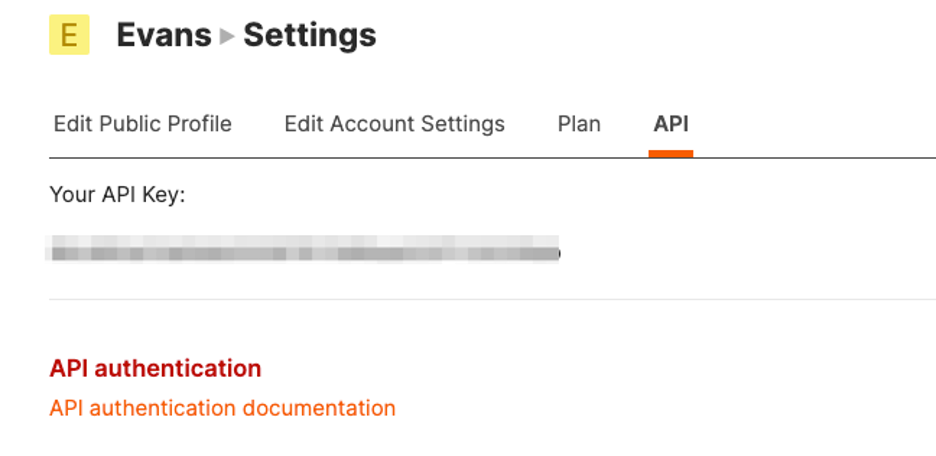
You can copy the token for use in your API requests.
Note:
- Keep Your Token Secure: Treat your API token like a password. Do not share it publicly or commit it to version control systems like GitHub.
- Regenerate Tokens: If you suspect your token has been compromised, we recommend you change your account password.
- API Documentation: Refer to our API Documentation here on how to use the token in API requests.